Fixel has just released a firmware update for the ‘XPort’ external, plug and play optical drive emulator. The revision 0.57 firmware allows for 100% compatibility with the entire redump disc set! That means this external solution should be equal in compatibility, but much faster than original CDROM drives. Fixel is also running a Haloween sale for anyone interested in purchasing either UDE. Discount codes, the update process and an easy capacitor fix for problematic 3DO’s can be found below the links…
Firmware Update: https://github.com/fixelsan/3do-ode-firmware/releases/tag/xp_fw_0_57
X-Port (external): https://3do.dev/products/copy-of-xport-ode-batch2
FZ-1-only Internal Version: https://retrorgb.link/fixelfz1
Bracket for FZ-1 Version: https://retrorgb.link/fz1odebracket
Discount Codes:
- 6% off FZ1 or XPort ODE (expires Halloween night). Code: halloween22
- Buy XPort ODE, get any other ODE at 13% off. Code: scarycyberturkeyxp
- Buy FZ1 ODE, get free ribbons. Code: scarycyberturkeyfz1
Update:
- To update, place the xpode.xpu file from Github on the root of your media (USB, MicroSD, etc).
- Boot to the XPort and Select X -> UpdateODE on the menu.
- Rapid blinking LEDs will indicate the update. It may take 1-2 minutes to complete. Console may reset during the update process.
- New startup is indicated by blinking “Image LED” during power on.
- That’s it!
Reset Capacitor:
The 3DO’s “reset capacitor” is a common source of issues when using both CDROM’s and ODE’s. While doing a full capacitor replacement is good practice – and will eventually be required on all of these classic consoles to keep them running – Not everyone has the time, skills or opportunity to make that happen. That said, there’s an easy fix that’s a decent alternative.
First, carefully disassemble your 3DO. There’s a ton of screws, but as long as you mark where each go (and remember the order you remove things in!), it should be pretty easy.
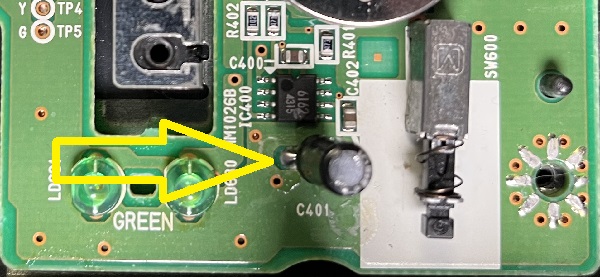
Then, for FZ-1 units (I tested both US and JP versions), locate C401, next to the drive tray eject button (click for a full-sized picture):

Even if you don’t have a desoldering iron, you should be able to carefully use a soldering iron to remove the original and replace it. Simply note the orientation of the negative leg and replace it with a brand new capacitor; The value in the ones I tested was 22uF, 5v, however any cap 20-100uF and a minimum of 10v should be fine as well.
Replacing this should fix the random hangs at boot and a few other issues you may run into with both discs or ODE’s.
Here’s the full list of changes to this firmware:
- Improved startup procedure, helps consoles with bad or missing reset capacitor
- Improved compatibility – tested and working on entire Redump set.
- Improved USB compatibility with odd drives.

