The SNES Mini and 1CHIP consoles output a much higher quality signal then the older SNES revisions, however all SNES consoles can be modded for high quality output. This video walks you through everything you need to know in detail, with
A Brief History of the SNES Revisions:
While there is only one board revision of the SNES Mini, the original Super Nintendo / Super Famicom consoles had many different motherboard revisions and chip changes! Most of the original SNES revisions used two video chips to produce a signal and these have been nicknamed the “2-chip” versions. For whatever reason, these revisions outputted a signal that looks like it has a horizontal blur applied (some kind of low-pass filtering?) and as you can see in the picture above, it’s a much blurrier image.
In 1995, Nintendo released a revision to their Super Nintendo consoles that combined the system’s two video chips into one chip labeled the S-CPUN. They appropriately labeled these motherboard revisions “1CHIP”. Three total revisions were manufactured, the SNS-CPU-1CHIP-01, SNS-CPU-1CHIP-02 and SNS-CPU-1CHIP-03. The SNES Mini / SNES Jr uses the same S-CPUN chip and produces an equal or better picture as the 1CHIP models.
Model Comparison:
2-Chip vs. 1CHIP:
I’d like to compare some of the worst “2-chip” consoles to the best “1CHIP”, a modded SNES Mini. It’s an easy comparison, as all the 2-chip models have video output that’s very blurry and while some are better then others, none come close to any of the consoles with the S-CPUN chip (1CHIP/Mini’s). Here’s a screenshot of two different “2-chip” models, next to a mini that had RGB enabled (more on that below) via the built-in S-RGB amp and the 1.2k resistors added to set the correct brightness level (click for full-sized):
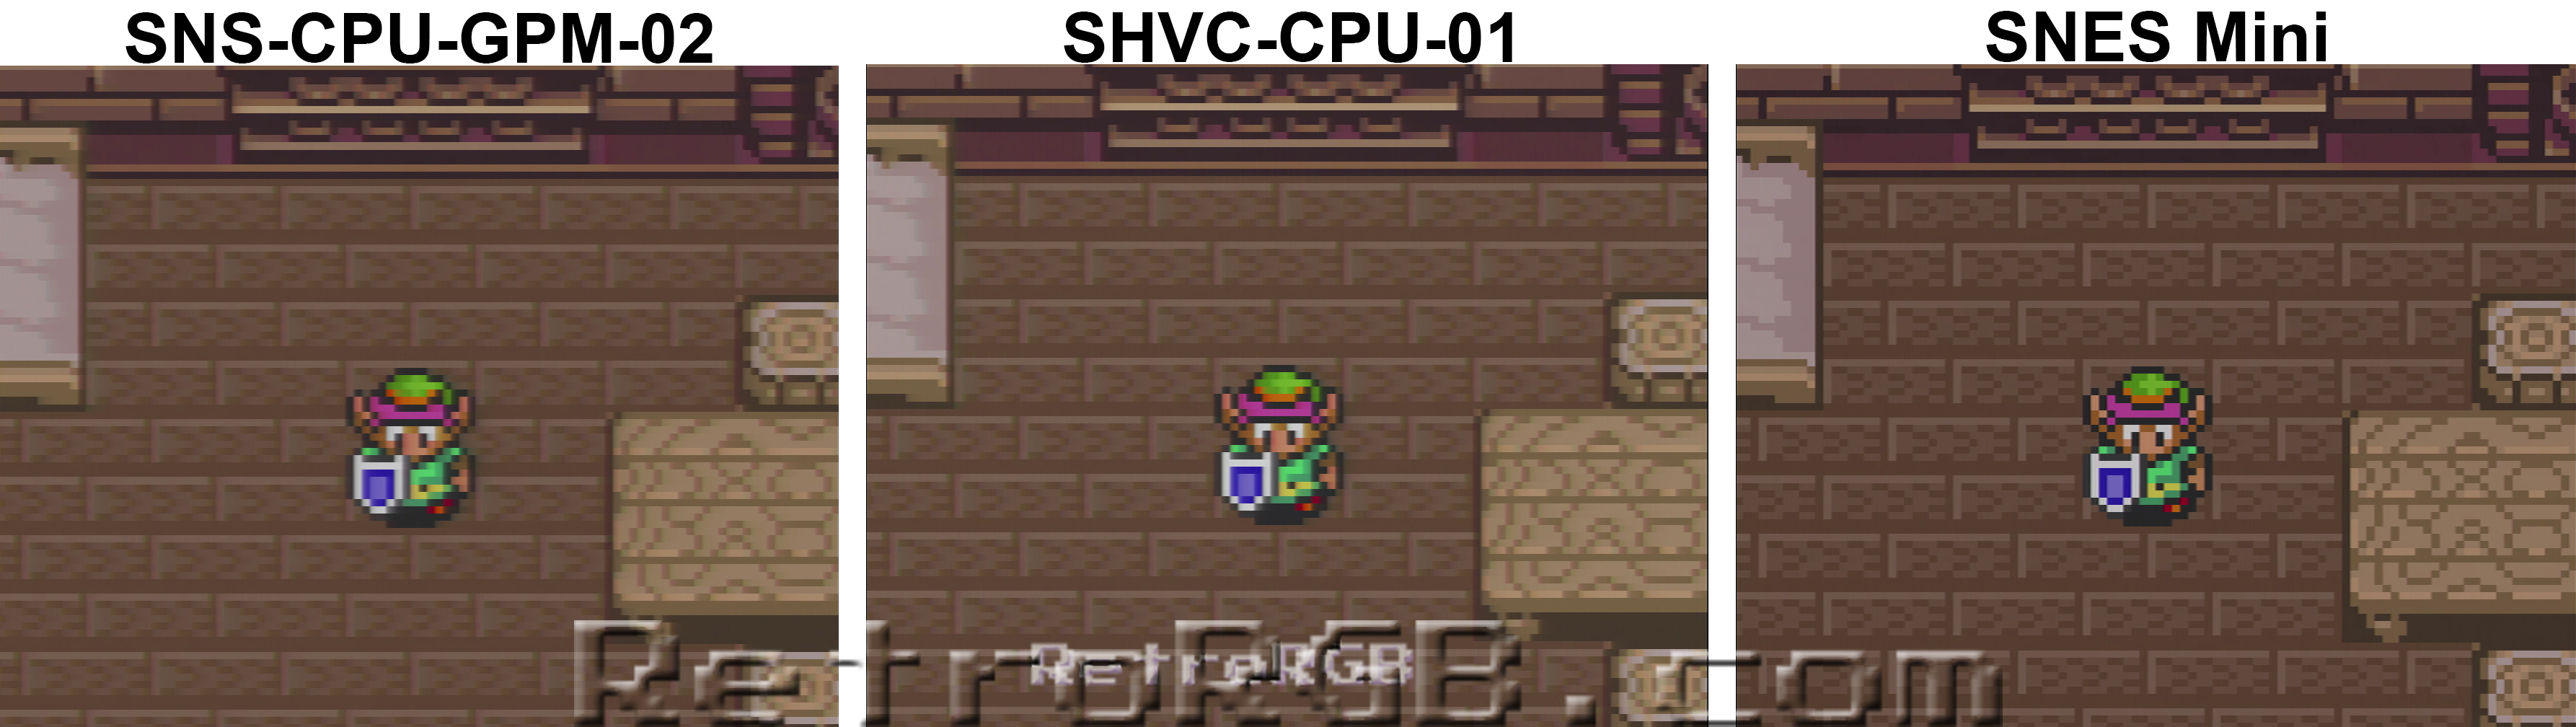
Sometimes side-by-side pictures don’t really demonstrate things well enough, so I wanted to show an animated GIF between the SNS-CPU-GPM-02 and the Mini. Please note that I tried to line up the two pictures as perfectly as I can, down to the pixel. What you’re seeing isn’t the image shifting to the right, it’s the filter / horizontal blur.

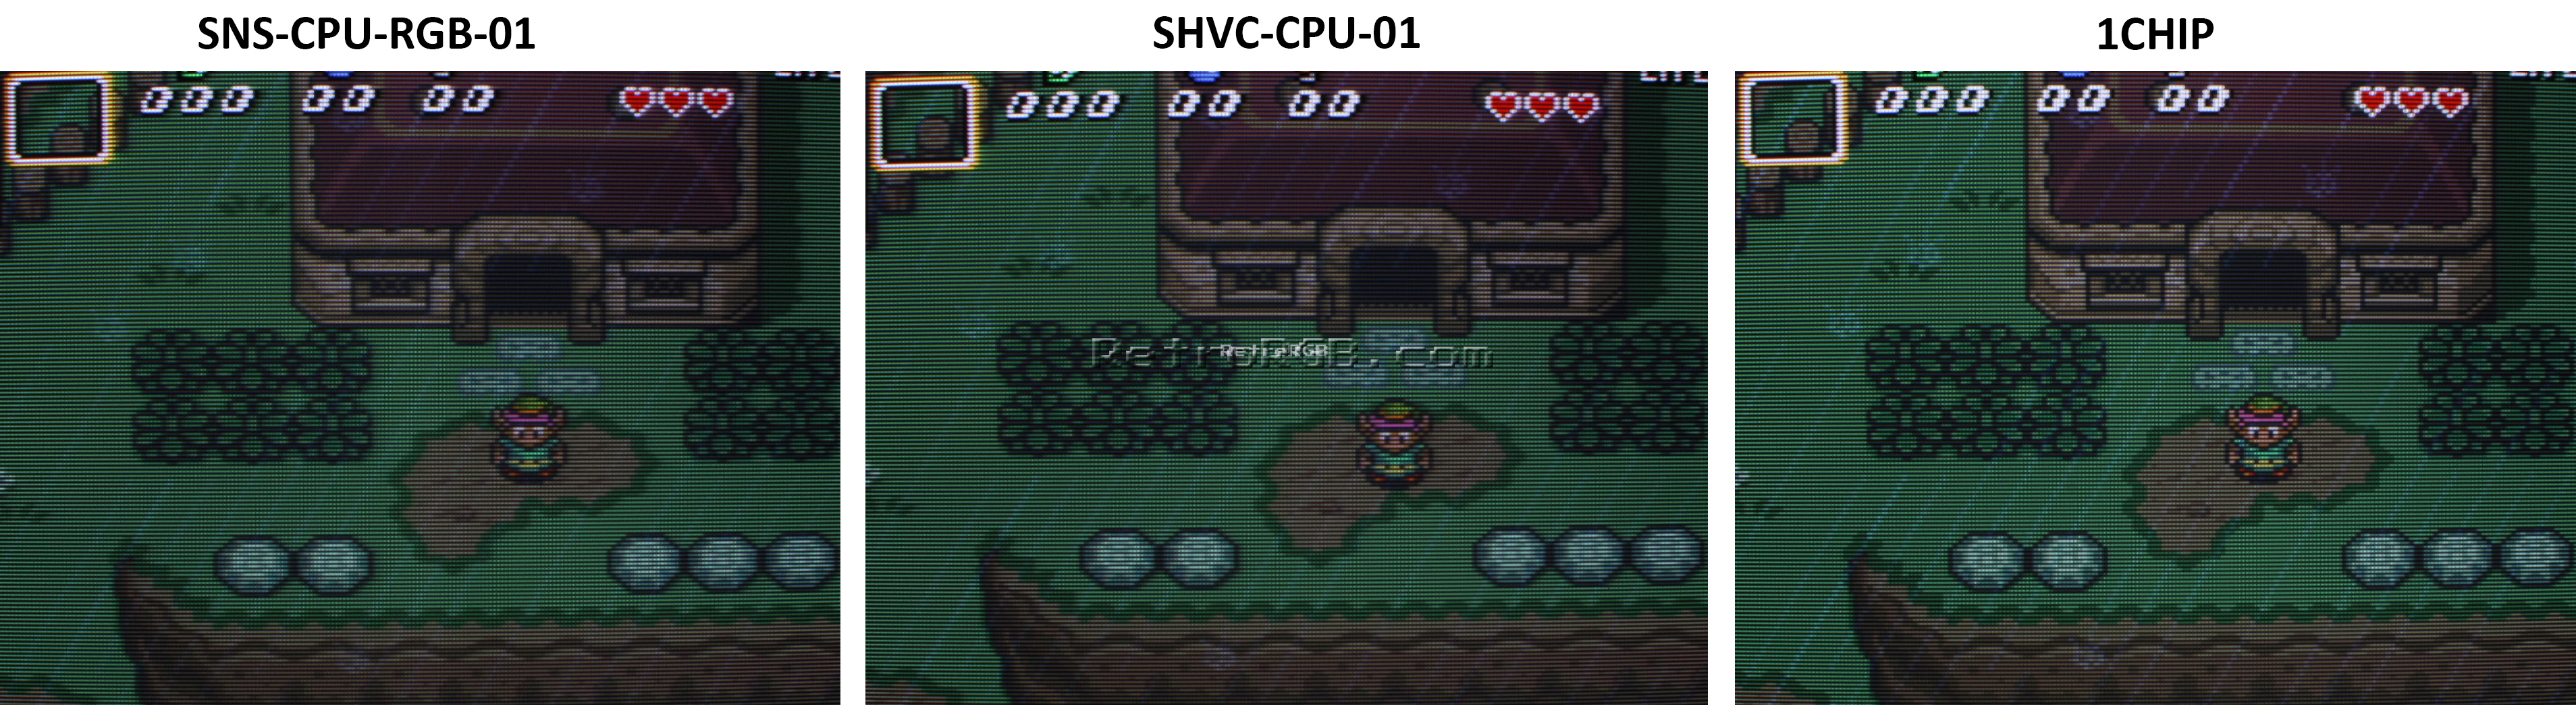
Also, here’s the original comparison pictures I took, using a DSLR and an RGB monitor. While they don’t show the differences as clearly as the screenshots above, they demonstrate what the differences look like on an RGB monitor (it’s much more noticeable in person). Click on each one for full-size:


For more detailed information on what exactly is happening to the 2-chip’s signal, check out Chris Covell’s page on the problem: http://www.chrismcovell.com/gotRGB/snesblur.html
1CHIP-01 vs -02 vs -03:
Comparing the differences between the 1CHIP revisions has been a huge undertaking! From the time I’ve launched this website until now, I’ve tested so many 1CHIP consoles and the results between each never seem to be consistent! I’ve seen two 1CHIP-01 consoles that were close in serial number (meaning probably from the same run of production) that outputted slightly different quality video. I’ve seen 1CHIP-02’s that looked awful, 1CHIP-03’s that looked phenomenal and every combination you can imagine. I can only speculate that the issues I saw were a result of age and use; Maybe some had bad capacitors? Maybe others had caps so bad they leaked and caused other issues on the board? Bad voltage regulator?
To make matters even more confusing, I’ve done an “RGB Bypass” on a few 1CHIP consoles using it’s own RGB amp and the picture quality definitely improved! That’s right, simply by lifting the output pins on the S-RGB chip, removing the resistors connecting the multi-out RGB pins, then connecting them together with wire and 75 Ohm resistors showed noticeable improvement on the one console I tested. That means there might actually be some kind of interference radiating across the 1CHIP motherboard and by “bypassing”, it moves the RGB lines away from the source of interference.
Overall, I believe it comes down to the tolerance range of components on the SNES’ motherboard; High quality resistors and capacitors can be purchased within 1% of their rating. That means a 100-ohm resistor that’s 1% tolerance can be 99, 100, or 101 ohms. Most major manufacturers would typically use 5% tolerant components which would explain the quality range across 1CHIP consoles. Some day, I’d like to try the (kind of crazy) task of replacing every single component on two SNES’ motherboards with the highest quality components possible and take before and after captures and oscilloscope readings. I’d be willing to bet that they’d both consoles would look slightly difference before and identical after.
All that being said, if video quality is a focus for you, perform an RGB bypass on whichever revision you own for the best output.
Different RGB mods for the SNES Mini / Jr. (Mod required for RGB):
A modification is required for the SNES Mini to output RGB and there are many choices available. The first thing to remember is both Mini and 1CHIP models output video that’s too bright. If you just wire an RGB mod (any of the mods) to a Mini without adding the brightness attenuating resistors, you’ll have the potential for washed out colors, ringing and possibly other unwanted artifacts.
The picture below demonstrates the different mods available (top row), as well as what it looks like when the brightness isn’t at the proper lever (bottom row). Some things to note about this comparison pic:
– This picture was zoomed approximately 50 times the original size to show detail.
– The pictures labeled “3-wire” (sorry for the weird label) are RGB-modded using the SNES Mini’s built-in S-RGB amp.
– Bypassing the on-board amp with the newer THS7374 chip looks either as good or better then the S-RGB (this is subjective, but you have to admit, it’s pretty damn close).
– Doing the bypass with a THS7314 chip (same as the DIY mods) still looks great, but the built-in low-pass filter slightly softens the image. Keep in mind that these pictures are zoomed and it’s barely noticable when playing. One other thing to note: It’s possible the LFP in the THS7314 is actually clearing up other issues, so maybe the softness tradeoff is worth it? – MORE TESTING IS REQUIRED TO DETERMINE

1CHIP vs SNES Mini / Jr.:
As stated above, more work needs to be done to fully understand what’s going on. The SNES Mini needs to be tested in the same places as the 1CHIP and the oscilloscope readings need to be compared. Hopefully some day this page will be updated with solid, scientific data and the picture evidence to match. Until then, the picture above is proof that all are excellent choices.
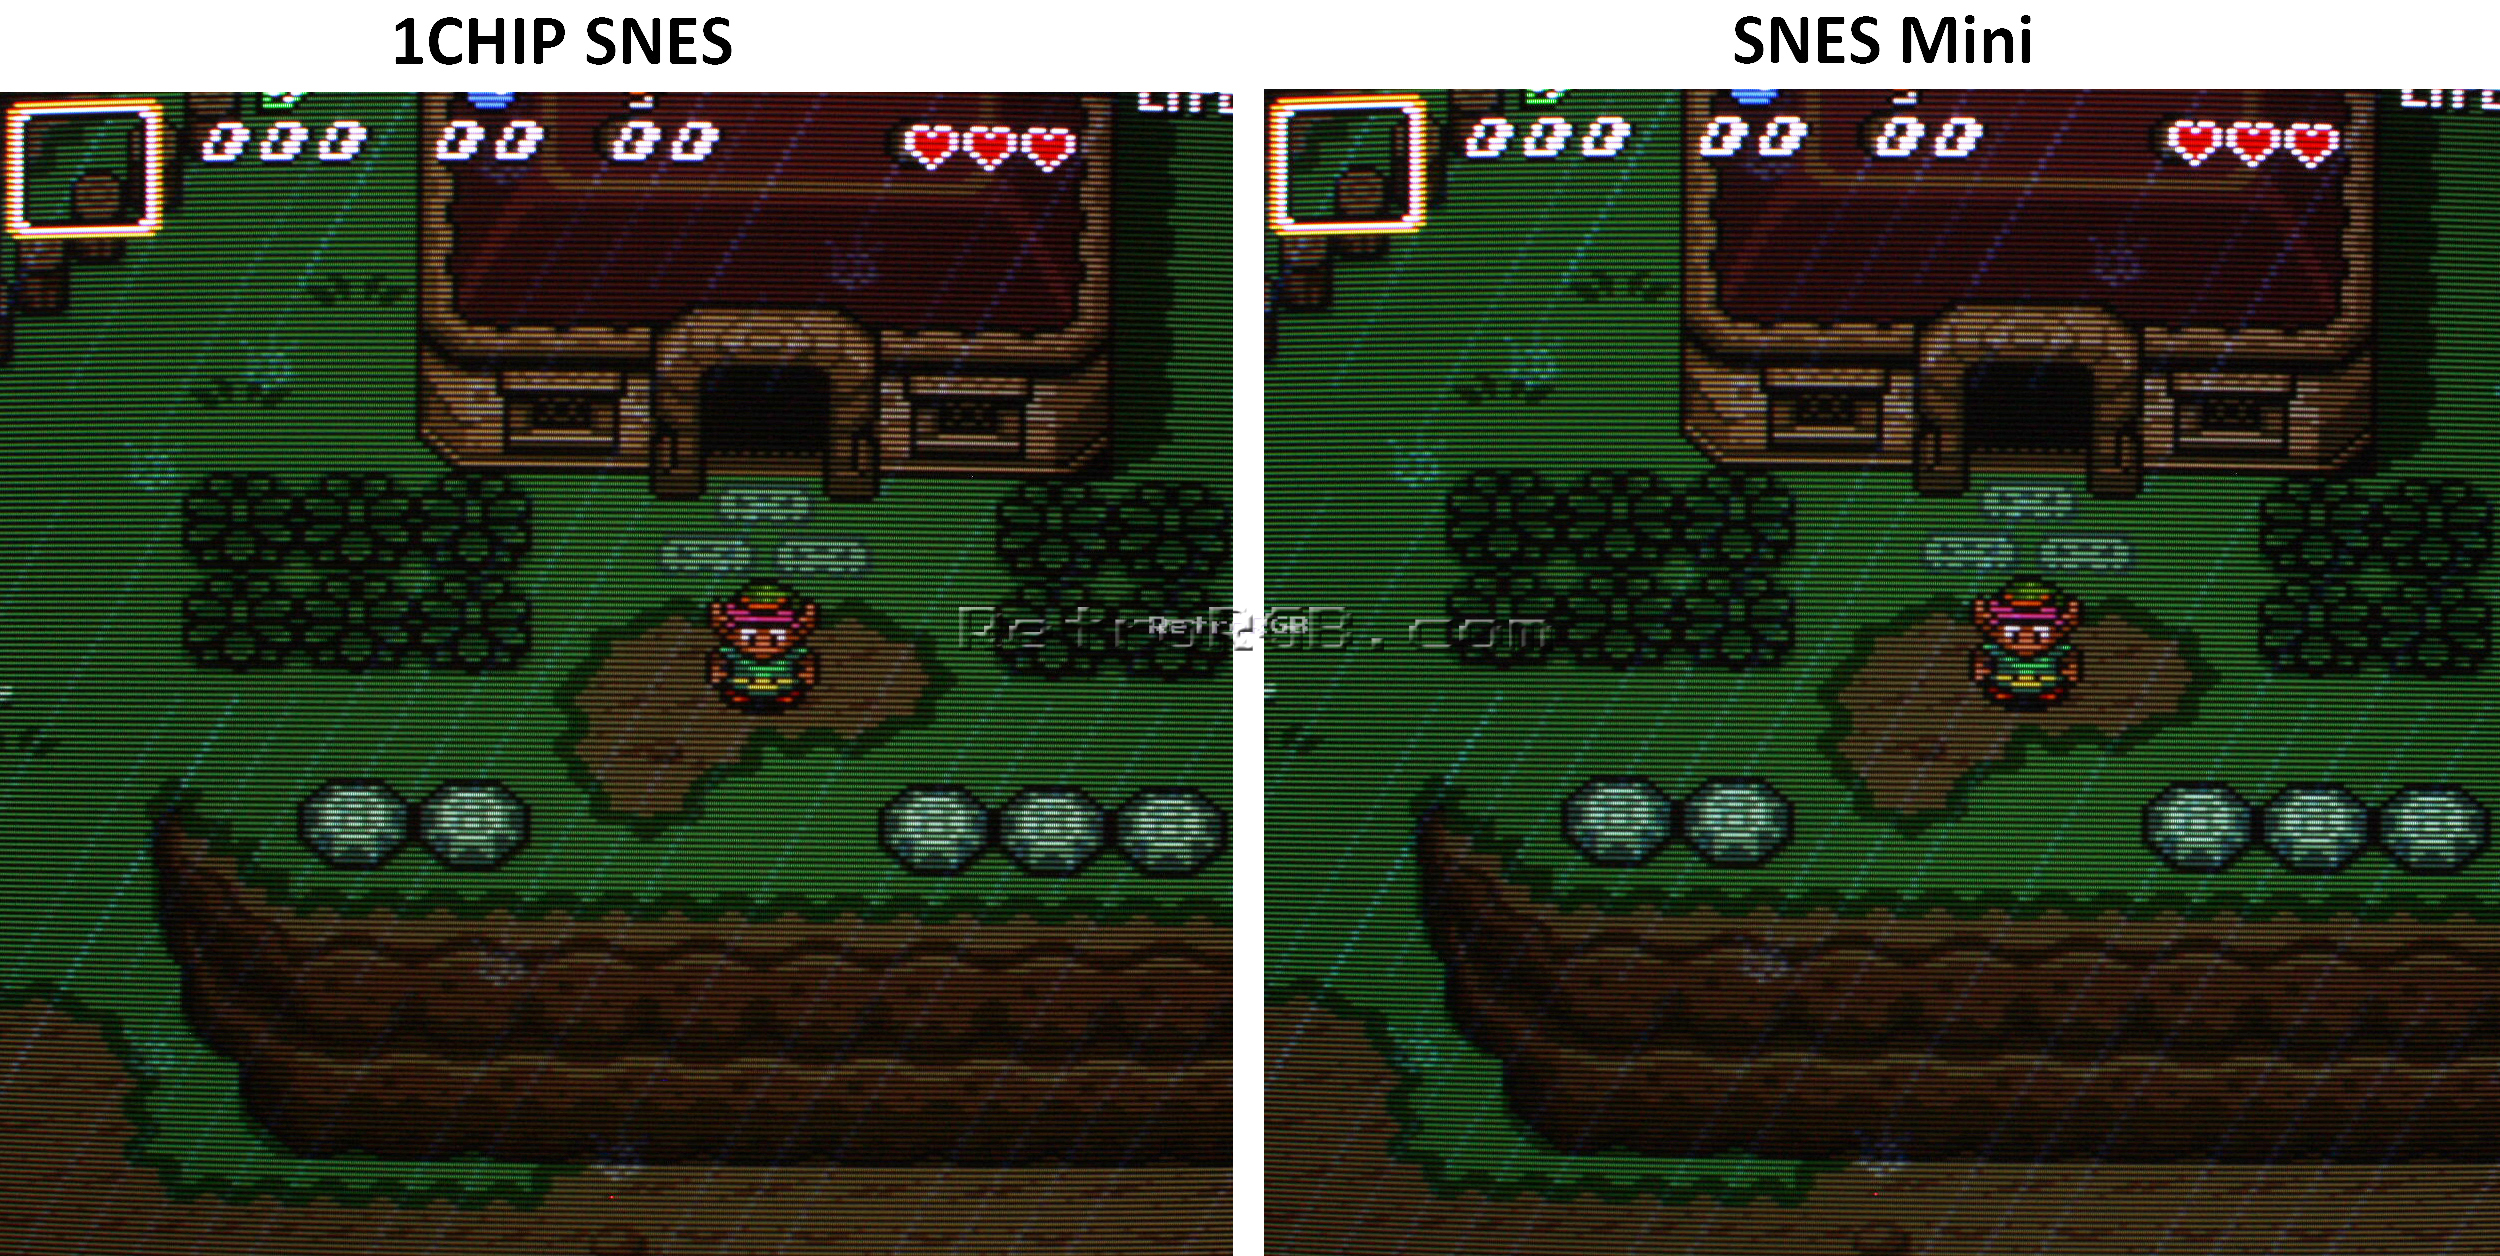
For reference, here’s the original comparison pictures I took, using a DSLR and an RGB monitor. The 1CHIP is an unmodified 1CHIP-01 and the Mini is modded using the built-in S-RGB amp, without the brightness-attenuating resistors installed. The Mini always looked a hair better in these pictures to me, but as discussed above, there are many factors involved (click on each one for full-size pictures):


Other Info:
Here’s some detailed info on the encoders that are found in the different SNES revisions:
http://console5.com/wiki/SNES / http://nfggames.com/forum2/index.php?topic=3525.0
There’s also a few forums discussing the differences between revisions. I strongly disagree with a lot of the negative views of the 1CHIP/Mini consoles, but I’ll leave it up to you to decide:
http://assemblergames.com/threads/best-snes-revision.38581/
http://www.racketboy.com/forum/viewtopic.php?f=52&t=46303
http://shmups.system11.org/viewtopic.php?f=6&t=43689
www.neo-geo.com/forums/showthread.php?245275-SNES-RGB&p=3699097&viewfull=1#post3699097
Conclusion:
Unfortunately, my conclusion isn’t an easy one and is different across each console. I definitely recommend a 1CHIP/Mini console over a 2-chip, but what to do with each one gets kinda complicated. I’ll try and break it down for you:
1CHIP:
– You can chose to do nothing and use the 1CHIP consoles as-is (1CHIP-03 would require a slightly different cable)! Overall, you’ll still get much better video output then using a 2-chip and it’s a great solution.
– If you’d like to try enhancing the output, for 1CHIP-01 and 1CHIP-02, I would start by simply adding the three 750 Ohm resistors to the RGB lines to lower the brightness to the correct level. If your console is in good condition and there aren’t any other issues, this solution will look amazing and nothing more needs to be done.
– For 1CHIP-03 consoles, try restoring csync, as well as adding the 750 Ohm resistors.
– If after trying the resistor mod, you still have issues or notice any blurryness, it might be worth doing an RGB bypass, either with the onboard S-RGB amp, or with a THS7374.
SNES Mini / Jr. (mod required for RGB):
– Even after showing that the on-board SNES Mini amp can produce an amazing picture, if you’re a beginner, I’d still recommend the THS7374 RGB bypass board (coming soon!), as it’s much easier to install and produces the same, if not better video output.
– That being said, if you don’t mind soldering to small pins, you might want to just use the S-RGB encoder that’s already on the motherboard. It will produce an excellent image and some might argue that since Nintendo specifically chose that chip, it’s the “right” one to use. DEFINITELY make sure to add the three 1.2k resistors on the RGB lines (as described in the guide), as it will bring the output to the current levels.
If you’re done, feel free to go back to the main SNES page. If you’d like info on mods for other systems, head to the Getting RGB From Each System page or check out the main page for more retro-awesomeness.