
The Time Sleuth is a device that sends an HDMI signal that flashes white bars on your display. Then, you hold the sensor that’s on the back of the TS up to those white bars and the device will display the amount of time it takes from when the signal is sent, to when the signal is detected. It was created by Christof and Dan, the makers of amazing HDMI mods for consoles such as the Dreamcast and PlayStation 1.
Purchase yours here: https://retrorgb.link/timesleuth
Basic Use:
To use the TS, simply connect an HDMI cable between it and your TV. Then connect a USB cable to your TV’s USB port for power. If your TV doesn’t have a USB port any charger should work fine, including a small battery charger.
Next, set the desired resolution via the selector knob and hold the time sleuth up to your TV.
Lastly, hold the TS’s sensor up to the white bars that are generated and it will display exactly how much time it takes from when the signal is sent, to when the TS’s sensor detects it on the screen.
MAKE SURE TO SET YOUR TV TO GAME MODE FOR THE BEST RESULTS!!! In fact, I suggest you toggle game mode, just to get a sense of how much lag is being saved.
While this video isn’t directly about the TS, it’s a perfect representation of how it works, as well as how to use it with CRT’s and through analog converters:
…and lastly, if you run into any issues with LCD panels, try putting a piece of standard printer paper between the Time Sleuth’s sensor and display:
Resolutions:
The Time Sleuth lag testing device can be programmed with up to five different resolutions and at the moment, there are 17 to choose from, including 50 and 60Hz modes. To assign these resolutions to each slot on the Time Sleuth, head to the main website and create your configuration: https://time-sleuth.i74.de/

After you’ve chosen a resolution for each position, hit “Generate Firmware” and wait for the file to be created. Please be patient, as this can take up to a few minutes.

Once it’s done, click on the zip file and download it to your computer.

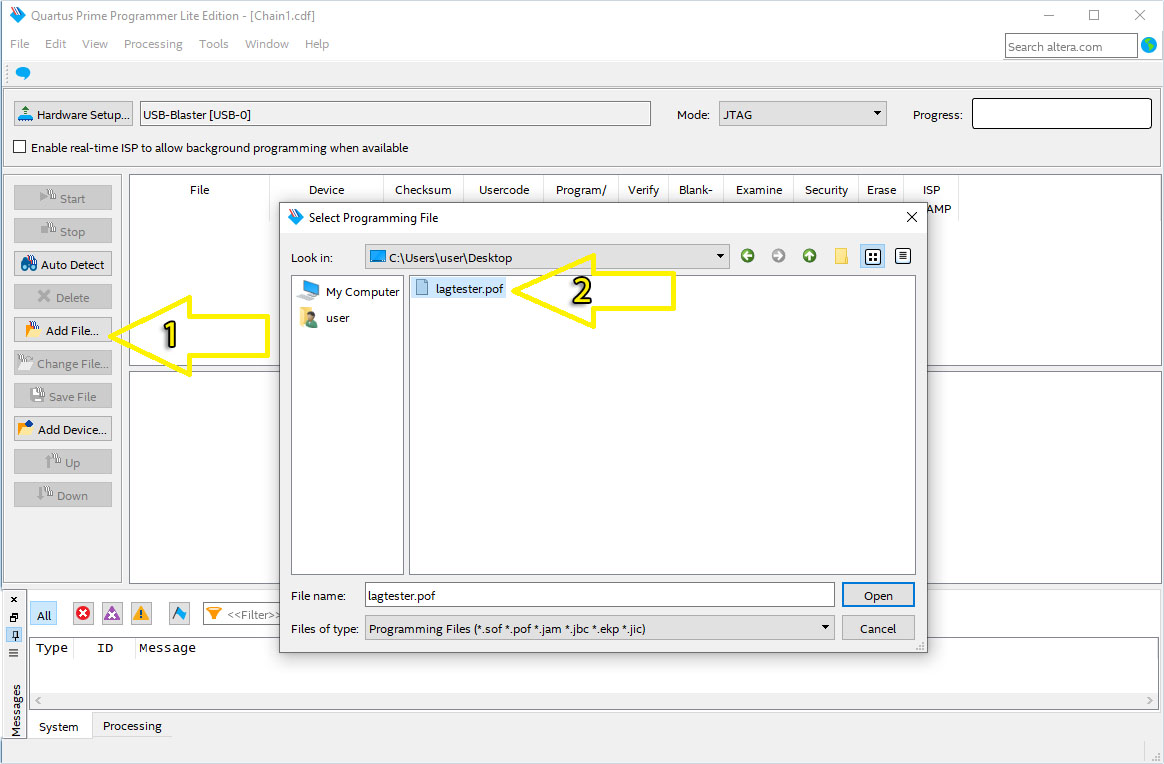
Lastly, extract the file inside that zip, which will be labeled “lagtester.pof” – This is the file containing the firmware and setup.
Flashing the firmware
The only downside of the TS is you need to use a “USB Blaster” and special software to flash firmware, you can’t just plug it into your computer. Luckily, the programmers are really cheap, the software is free and the instructions below (click on all pics for full-sized) should give you all the info you need to flash your own.
USB Blaster: https://amzn.to/2Efbn5g
– Download and install the software:
Here’s direct links to the programmer only. With these, there’s no need to install the whole Quartus Prime suite or to register:
Linux 64bit: http://download.altera.com/akdlm/software/acdsinst/18.1std/625/ib_installers/QuartusProgrammerSetup-18.1.0.625-linux.run
Windows 64bit: http://download.altera.com/akdlm/software/acdsinst/18.1std/625/ib_installers/QuartusProgrammerSetup-18.1.0.625-windows.exe
Windows 32bit: http://download.altera.com/akdlm/software/acdsinst/18.1std/625/ib_installers/QuartusProgrammerSetup-18.1.0.625-windows32.exe
– Install the Quartus Prime software. This might take a really long time, as I believe it’s downloading more components during the installation. Even on my fast PC, it took about ten minutes.
– Connect your USB Blaster and check that it installed correctly.
You’ll want to check your Device Manager to make sure the USB Blaster was detected as an “Altera USB Blaster”. If so, you can skip to the next step. If not, double click on whatever the USB Blaster shows, or the “unknown device” if nothing automatically installed:

Click on “Update Driver”, then “Browse my computer for driver software”:
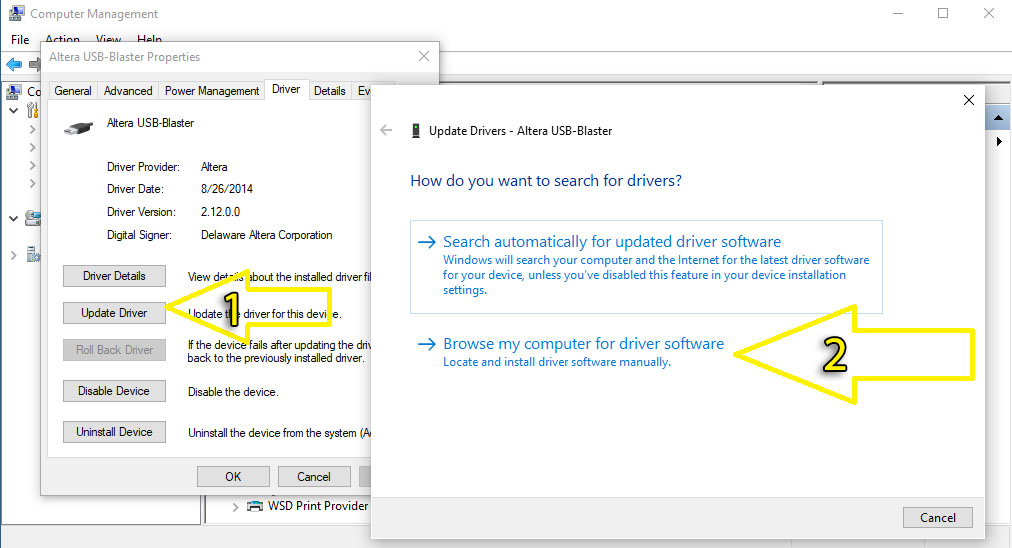
Search for drivers wherever you installed the Intel software. The default location is usually either “C:\intelFPGA_lite”, or “C:\intelFPGA”. Also, make SURE you check off “Include Subfolders”.

Hit “next” and the USB Blaster drivers should properly install and the Device Manager should read “Altera USB Blaster”, as shown above.
– Once you’ve confirmed the USB Blaster is showing up properly in the Device Manager, unplug the USB cable.
– Connect the USB Blaster to the Time Sleuth, using the JTAG cable the USB Blaster should have shipped with.
– Turn the Time Sleuth’s knob all the way to the left, to position 1
– Connect USB power to the Time Sleuth first, then the USB Blaser.
WARNING: If the Time Sleuth is in any position other than #1 when USB power is connected to both devices, it will error out! No harm will be done, just unplug everything, turn the knob all the way left and start over.

– Launch the newly installed software “Programmer (Quartus Prime 17.1)”, which should be under Start\Programs\IntelFPGA. Then click on “Hardware Setup” and make sure the USB Blaster is detected. If not, try using a different USB cable…and of course, try rebooting the PC as well. If the programmer isn’t detected, you won’t be able to proceed.

– Load the .pof file you created with all the different resolutions installed.
– Select all three checkboxes under Program/Configure, Verify and Blank Check. Then hit Start to begin the flashing process.
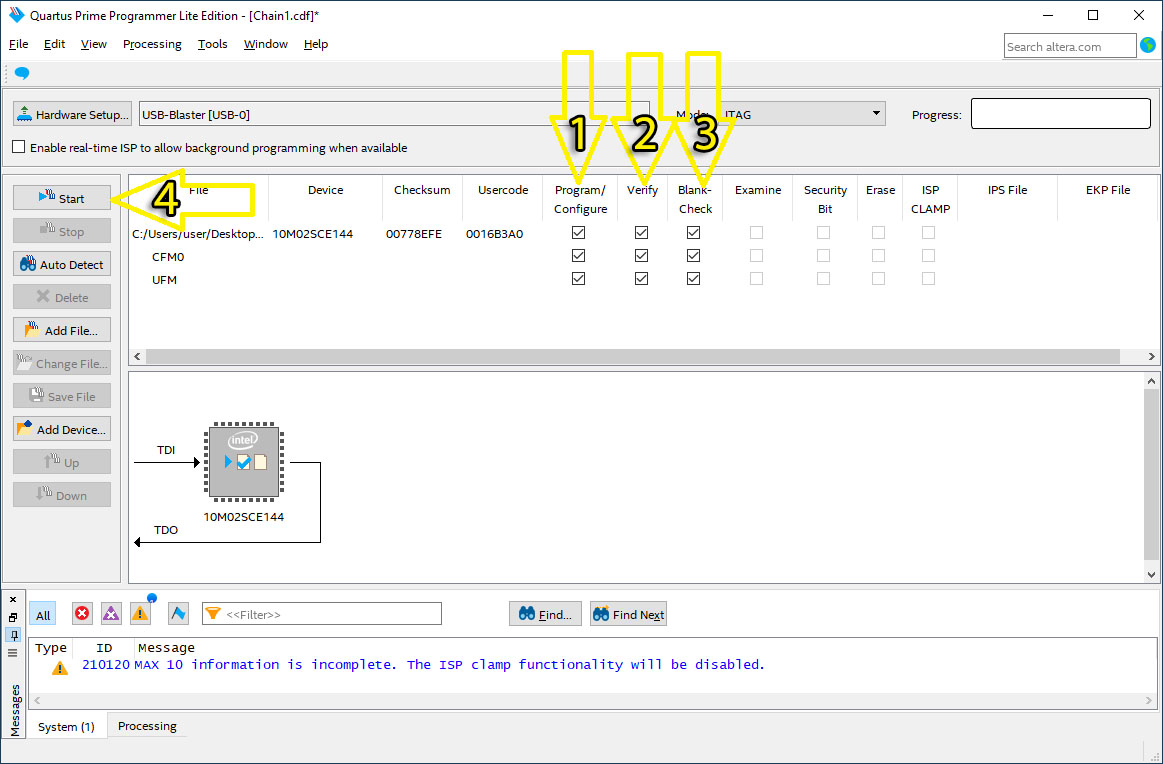
– That should be it! If all went well, you should see 100% in the upper right corner and no error messages in the bottom status window. If you had any issues at all, go back and check all the driver and installation steps above…and, MOST IMPORTANTLY, make sure the knob was all the way left, in position #1!

That’s it for now! I’ll update this page if there’s any major changes to the flash procedure, or the Time Sleuth itself.
Please feel free to check out the other pages on this site, as there’s tons more retro-awesomeness to share! Also, if you have even a small interest in retro gaming, check out the Getting Started page to help point you in the right direction!