
RetronLabo and RetronFreak are Custom Firmware (CFW) for the RetroN 5 retrogaming console that pack a ton of features like ROM dumping and save backups for multiple cartridge based systems. Find the install method and video on the subject below, with the interesting history of the project up next.
Some features made available by these projects:
- Play ROMs and images from SD Card
- ROM dumping to SD Card
- Game save backup to SD Card
- Support for PC Engine
- Support for PSX
- Support for WonderSwan Color
- Support for Next Generation Portable
- Support for FB Alpha
Keep reading for more background on the project, or just jump to the install sections with the anchor links below.
Jump to Install CFW Instructions
Jump to Install CFW Downloads
Jump to Unbrick Instructions
Jump to Unbrick Downloads
The Backstory of RetronLabo and RetronFreak
If you’re not familiar, the RetroN 5 is a solid little console and a decent choice for some cart-based retrogaming. It supports NES, Famicom, SNES, SFC, GBA, Gameboy, and Megadrive. It has some nice features and loads the ROM into memory, allowing you to play games, even upscaling to 720p for more modern HDMI devices.

If you are familiar with the RetroN 5, you may know about the CFW from creator RetronLabo, who wrote this post for RetroRGB several years ago. It was a hack for the console that unlocked playing ROMs, and adding many new systems with some updates. The CFW was made available to patrons and required a donation in exchange for a download. The process of installing was convoluted, containing 27 steps documented in the original RetroRGB post. Eventually the firmware disappeared from circulation, impossible to get even with the donation payment.
To Quote RetronFreak dev ManCloud:
It's been a long time since Retronlabo released the CFW for
the RetroN 5 of the same name. Back then, however, this
particular firmware was only available to donators... and soon
after to no one else. As far as I know, Retronlabo went into
nirvana without another word and was never seen again...

(Via Google Translate)


Lang Lang ist es her, da hat retronlabo die gleichnamige CFW
for den RetroN 5 rausgebracht. Damals war diese spezielle
Firmware allerdings nur Donatern zugänglich... und bald darauf
niemandem mehr. Soweit ich weiß verabschiedete sich retronlabo
ohne ein weiteres Wort ins nirvana und ward nicht wieder
gesehen...

(Original German)
ManCloud was a dev working on dumping the RetroFreak firmware. He had assumed the similarities in the RetroFreak and RetroN 5 consoles meant they were sharing (or stealing) tech from one another. Because the consoles were so similar, he was able to create a custom firmware for the RetroN 5 using this dump of the RetroFreak, initially releasing in 2019. This meant he was able to recreate the ROM playing experience of the RetronLabo firmware, and also implement the ROM dumping to SD and save backup features. ManCloud was also able to implement the firmware update into a Factory Reset/Rescue disk image, meaning the 27 step process of installing custom firmware was no longer needed, making it far easier to mod the RetroN 5 console.
But the RetronLabo CFW was still no longer available, and ManCloud, along with Reminon, were still trying to make the older firmware available to the public. After apparently contacting RetroN 5 forum users for quite some time, user Stone contacted ManCloud in July of 2020, offering to help provide the custom firmware for dumping so that it could be made public.
So RetronLabo was re-released using the “Rescue Image” method in December of 2020, and again on January of 2021 by Stone on the RetroN 5 forum.
This means there are 3 options for CFW with features:
RetronLabo
Play backup games/ROMs from SD Card
New systems added
(PC Engine, PSX, Wonderswan Color, Next Generation Portable,
FB Alpha)
RetronFreak 1.5

Initial Release from ManCloud
Play backup games/ROMs from SD Card
ROM dumping to SD Card
Game save backup to SD Card
Original hardware controller support
(not available on RetronFreak)
How to Install Custom Firmware to RetroN 5
The process has been made easier than ever thanks to the work of ManCloud and other community members, but first some warnings.
The bad news is it is likely you can brick your RetroN 5; in fact it happened to me as I was testing. The good news is it’s relatively easy to fix this, and this will be included in this post. See section below, “Help! How to Unbrick Your RetroN 5 After a Failed CFW Install”
Basic Tools for Installing Your Custom Firmware

You will need an SD Card greater than 2GB, the older full-size style, as the RetroN 5 has issues surrounding the microSD standard with adapter. You cannot use a microSD.
You will also need a wired controller compatible with NES, SNES, or Genesis/MegaDrive.
Since we are working with SD Cards and images, download and install:
Win32DiskImager (If you prefer, BalenaEtcher is also fine)
SD Card Formatter
This guide assumes you will be using a Windows PC, but similar software is available for Linux and Mac.
Download Custom Firmware Packages
Download one (or all) of the custom firmware. You can only use one on your RetroN 5 at a time, and will have to flash again to test a new one.
ManCloud’s RetroNFreak 1.5 | Mirror
ManCloud’s RetroNFreak 2.5 | Mirror
Download the 7zip files and extract them to a location where you can find them.
Prepare SD Card
If you have used your SD as a boot disk or have put partitions on it, start by using SD Card Formatter to remove them. Simply run the SD Card Formatter, making sure the drive targeted is the full size SD Card, and tell it to format. Quick format should be fine, our main goal is removing partitions that your OS may not see but might create issues with the RetroN 5.
Image SD Card with CFW

If you have Google Drive installed on your machine, you will have to close it to open Win32DiskImager. This is simply an annoying error with the software.
With Win32DiskImager open, choose your extracted IMG file of the CFW that you want, and target your SD Card.
This only takes a few moments. You will know it is done when Windows opens 5 to 10 error windows. Windows is trying to read the partitions the imager writes–the RetroN needs them, but Windows loses its mind when the disk is done. This is also annoying but harmless. Simply cancel out of all of them and eject the SD Card.
Flash RetroN 5 with Imaged SD Card
Insert the SD Card into your RetroN 5 in the card reader slot on the back of the system. With this done, power on the system. You will need it hooked up to a display, and will need the wired controller at this time.
The system rescue menu will load. This process should be identical no matter which CFW you have imaged your SD Card with.
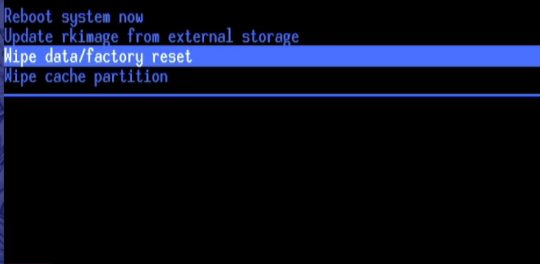
Navigate down to “Factory Reset” and click run. This can potentially save you the hassle of unbricking your system. According to dev ManCloud it is unknown why the bricking sometimes happens, but this additional step can help. If you are trying again after restoring, definitely take the time to do this step.

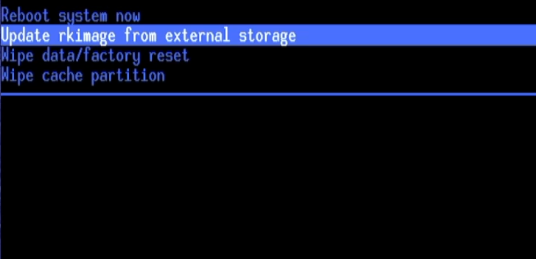
Once the factory reset is done, you can run the “rkimage” routine. This will install the CFW and flash the system. Select this and sit back, as it takes 3 to 5 minutes. As with all custom firmware, ensure that the system does not lose power, and do not attempt to turn it off.
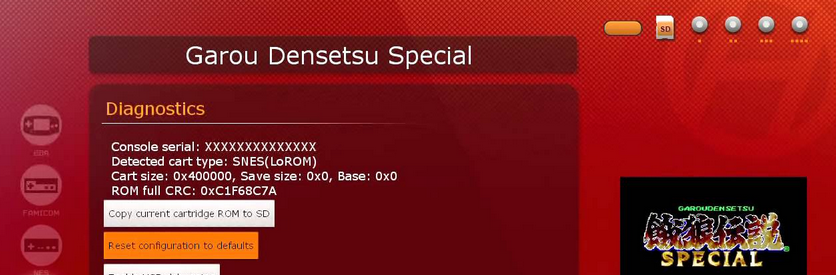
When it tells you it is completed, select “reboot” and pull the SD card from the RetroN 5. Depending on which CFW you chose to use, you will have access to new game systems and ROM dumping to your SD Cards, including microSD.
Bonus: Prepare microSD for RetroN systems
In my testing, ExFAT is not recognized in the RetroN, and you’ll probably want to use a microSD for game and save storage (this is ok with a microSD with adapter). The standard tool for this is GUIformat, the Windows version of Fat32Format.
Help! How to Unbrick Your RetroN 5 After a Failed CFW Install

In my testing, my first install did, in fact, fail and brick my RetroN 5, going to a white screen on my livestream, and bumming me out in general. (Yes, I’m showing a black “No Video” screen, but me looking at a white block on the screen looked dumb here. Your bricked RetroN will probably output the white screen.)
Thankfully it is well documented and there is a pretty bulletproof way to restore the RetroN 5 to working order and try again. Simply rebooting with the CFW image will not work. The method for fixing it is not that complicated, which is also good.
If your RetroN is stuck at the white screen, you will need a few things to fix it.
USB A to Mini B Cable
A Windows PC, as this software is Windows Only. I tested with Windows 10.
A Pin, Pushpin, or Paperclip that has been straightened out
Download Software
The RetroN Unbricking Pack | Mirror by ManCloud. Extract this to a location you can easily find.
Install RockChip Driver

We are going to be connecting to the internals of the RetroN and restoring the chip using it as a connected device. First we install the driver as found in the pack. You will find that the folders are set up in a progressive way, and those represent the steps of the unbricking process.
There are several versions of the driver in the driver folder, but I found that “DriverInstall.exe” worked just fine.
Install Registry Fix

On Windows 10, you will have to install a registry hack to do this correctly. Once the driver is installed, find the folder named WIN10_Driver_Fix. Double clicking the REG file will allow you to chose to install it into your registry.
Connect RetroN 5 to Your Windows PC

If you haven’t done it already, connect your powered off RetroN 5 to your windows PC via the USB cable and the USB mini port in the back of the RetroN. You will not need video out from the RetroN, nor a wired controller for this step.
In the bricked state, sometimes my RetroN would come on as soon as it was connected to power; I kept it unplugged until I was ready for these steps.
Find the reset pin on the back of the RetroN. It is covered with a sticker, which you can either poke through or remove–I removed mine.
With power connected, hold the reset pin in with your pushpin or paperclip WHILE holding down the power on the front of the system. You will need to hold both of these until you hear Windows recognize a new device. Once you hear that, you can move on to the next step.
Run RKBatchTool and Image System
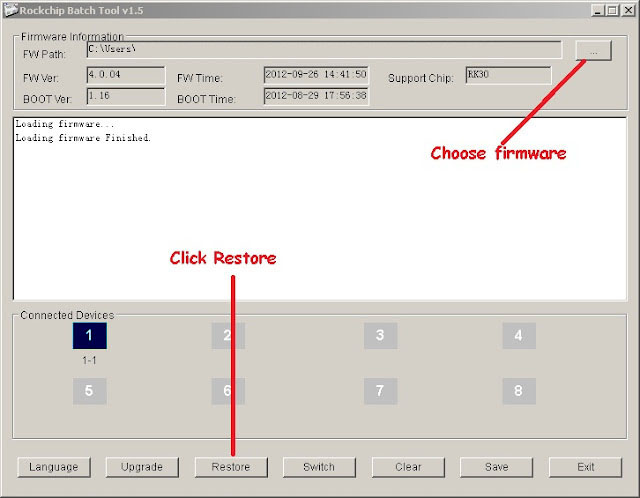
Once you have heard Windows recognize the new device, you can run RKBatchTool.exe from the next folder in the Unbricking pack. You will see the program load and a blue square will appear. This is good, it means that your RetroN is fully connected. Click the “…” button and select the restore.img from the next folder in the pack.
Once it is loaded, press “Restore.”
When this is complete, you can close the programs, unplug the RetroN, and attempt to power it on, reconnecting the controller and HDMI.
Your RetroN should now be unbricked and ready to image with the CFW of your choosing.
Resources:
https://circuit-board.de/forum/index.php/Thread/31357-RetroN-5-CFW-RetronLabo-die-CFW-mit-dem-Extra/
https://www.retro5.net/viewtopic.php?f=9&t=66526
Special Thanks:
ManCloud, RetronLabo, Stone, Reminon, Tom Phobos, Ice Man, and the users of Circuit-board.de and their discord.
