
This weekend, I decided to fully restore a Super Nintendo “1CHIP” console I had and wanted to post what I did, as well as why I did it. The basic theory of what to do would apply to almost any console, however the origin of RetroRGB started with my love for the Super Nintendo and it’s a console I’m confident working on, so I felt like doing a post about it 🙂
Before I begin, I’d like to point out that almost none of this is required for an excellent retro gaming experience. With the exception of caps (more on that in a sec), these mods are things I choose to do, to squeeze a bit more performance from the console. If you want an excellent Super Nintendo experience, all that’s required is the original cables and a CRT, or a properly designed scaler (RAD2x / RetroTINK / OSSC). You don’t need to do a lot of work to a console to enjoy playing it, but if you’re the type of person who enjoys restoration as much as gaming, this post is for you!
Capacitor Check / Replacement:
The only part of this restoration I’d say should be “mandatory” on all consoles is to check to make sure the capacitors aren’t leaking. This is especially true for the Game Gear, Turbo/PCE Duo, Turbo/PCE Express and Original Xbox (at least one cap).
Leaky capacitors are the issue here; If caps just dry out, your console will simply stop working. When that happens, replace the caps and you’re back in business. The very serious issues occur when fluid in the capacitors leak out onto the motherboard, not just dry out. When this happens, the fluid can corrode the motherboard and damage traces. If left unattended for too long, the motherboard can be permanently and irreparably damaged.
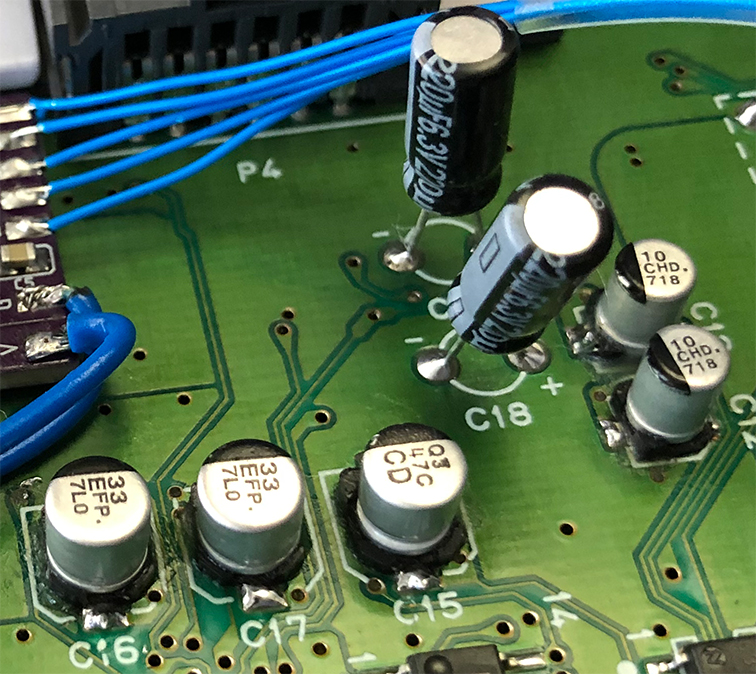
Even if your console isn’t known for having leaky capacitors, I highly recommend at least opening it and checking. While the Super Nintendo isn’t known for having leaky capacitors, I have seen it happen, so I decided to change all of mine to brand new, high quality ones. This may not have been necessary, but it’s good peace of mind, as I won’t have to worry about checking again for a long time.
Unfortunately, without actually removing SMD caps, you’ll only be able to see really bad damage and any minor damage (or the start of bad corrosion) might be under the caps as shown below (PCE Duo shown). Note the pads for the capacitor that didn’t leak are in perfect condition and also note that the corrosion under the bad cap hadn’t spread far outside of the cap area. That means an untrained eye might have missed the leak and the capacitor fluid would have continued to corrode the motherboard until it reached an unfixable point.

My modding skills are above beginner, but not much past “intermediate” and I found replacing the capacitors in a SNES about the same challenge as a Sega Genesis: There were less caps overall, but the SMD caps were a bit harder to remove, so I feel they’re about even projects. Consoles like the Saturn are much harder, as there’s a ton of caps and a lot of SMD as well. Also, if your console has damage (or is known to have damage) like shown above, then I strongly recommend contacting a professional. Heck, even a console that’s rare might be worth sending to a pro, as you never know if you’ll run into a problem halfway through; What if you break a trace on a rare console during a cap replacement? I might be comfortable fixing that on a Genesis 1, but not a CDX. The point is, feel free to try it yourself, but know that in many cases you may need the help of a pro. DIYers can get high quality cap replacement kits here: https://console5.com/store/cap-kits.html
Cleaning
With classic consoles and controllers getting older every year, it’s only natural that they’ll get dirty. On top of that, after changing hands across many different owners and stored in many different environments, it’s common to find things in consoles that you really wish you hadn’t found.

Every time I receive a new console or controller, I always perform the same cleaning on it: Strip it all down, blow out the electronics with compressed air and scrub the plastic with soap and a brush (or sometimes Goo Gone, soap and a brush). As long as you use a brush with soft bristles, you won’t scratch the console; After ten years and probably hundreds of systems passing through my hands, I haven’t scratched a single console and the only “damage” I’ve ever done is fading the stickers on the bottom of a console. In my opinion, that’s a small price to pay for disinfecting and cleaning old, gross consoles.
I also try to clean the cartridge connectors as well, by wrapping an old t-shirt over a credit card, dousing it in isopropyl and using it to scrub the contacts. In some cases (like the front-loading NES), you might need to replace the cartridge connector, but usually a thorough cleaning will be all you need. Just don’t use metal polish, or any corrosive materials: Cleaning Cartridge Connectors
You can go a step further and clean the circuit boards with isopropyl and an “electronics brush”, but it’s not necessary unless you suspect corrosion. I wanted this board to look nice, so I used a flux cleaner pen, both to clean up the work I did and to remove some factory flux you’ll often find on these boards. After using flux cleaner, I carefully wiped it down with a paper towel, then doused it in isopropyl, and carefully brushed the entire board clean of as much of the left over flux, dust and everything else I could find. I ended by wiping down anything left over with a paper towel and then going over the entire board with compressed air – Especially around and under the chips! Even after using compressed air, I made sure to let the board sit for a few moments before powering on, just to be safe.

It’s my opinion that opening and cleaning a controller is much more important than cleaning a console’s case, since there’s years of people’s germs floating around in those. I scrub each button, as well as the controller plastic when I clean mine. Also, simply cleaning a controller often isn’t enough for a full “restoration” and you’ll need to replace the pads inside the controller. Some pad replacements are hard to find, so I recommend once again checking Console5.com first.
If your controller has been giving you trouble, then consider this the only other “mandatory” mod in this guide, as how can you expect to have a good gaming experience if your controller isn’t performing properly? In almost every case, a thorough cleaning and quality replacement pads will restore your controller to like-new condition.
White Line Issue:

One issue that plagues the “1CHIP” and Mini Super Nintendo / Super Famicom consoles is a white line going down the center of the screen. After years of research, this was determined to be a result of the power filtering on the SNES. Simply using a quality ROM Cart like the FXPak Pro will almost completely eliminate the white line, however people using original cartridges will still need to perform this mod.

The first step in reducing (or removing) the line is replacing the 7805 voltage regulator with a newer, more efficient one: The 78S05. When I replaced mine, I also thoroughly cleaned the heatsink with ispropyl and added thermal paste to help transfer the heat. This is absolutely not necessary, however my thought was if it reduced the heat by even one degree without any negative repercussions, why not?
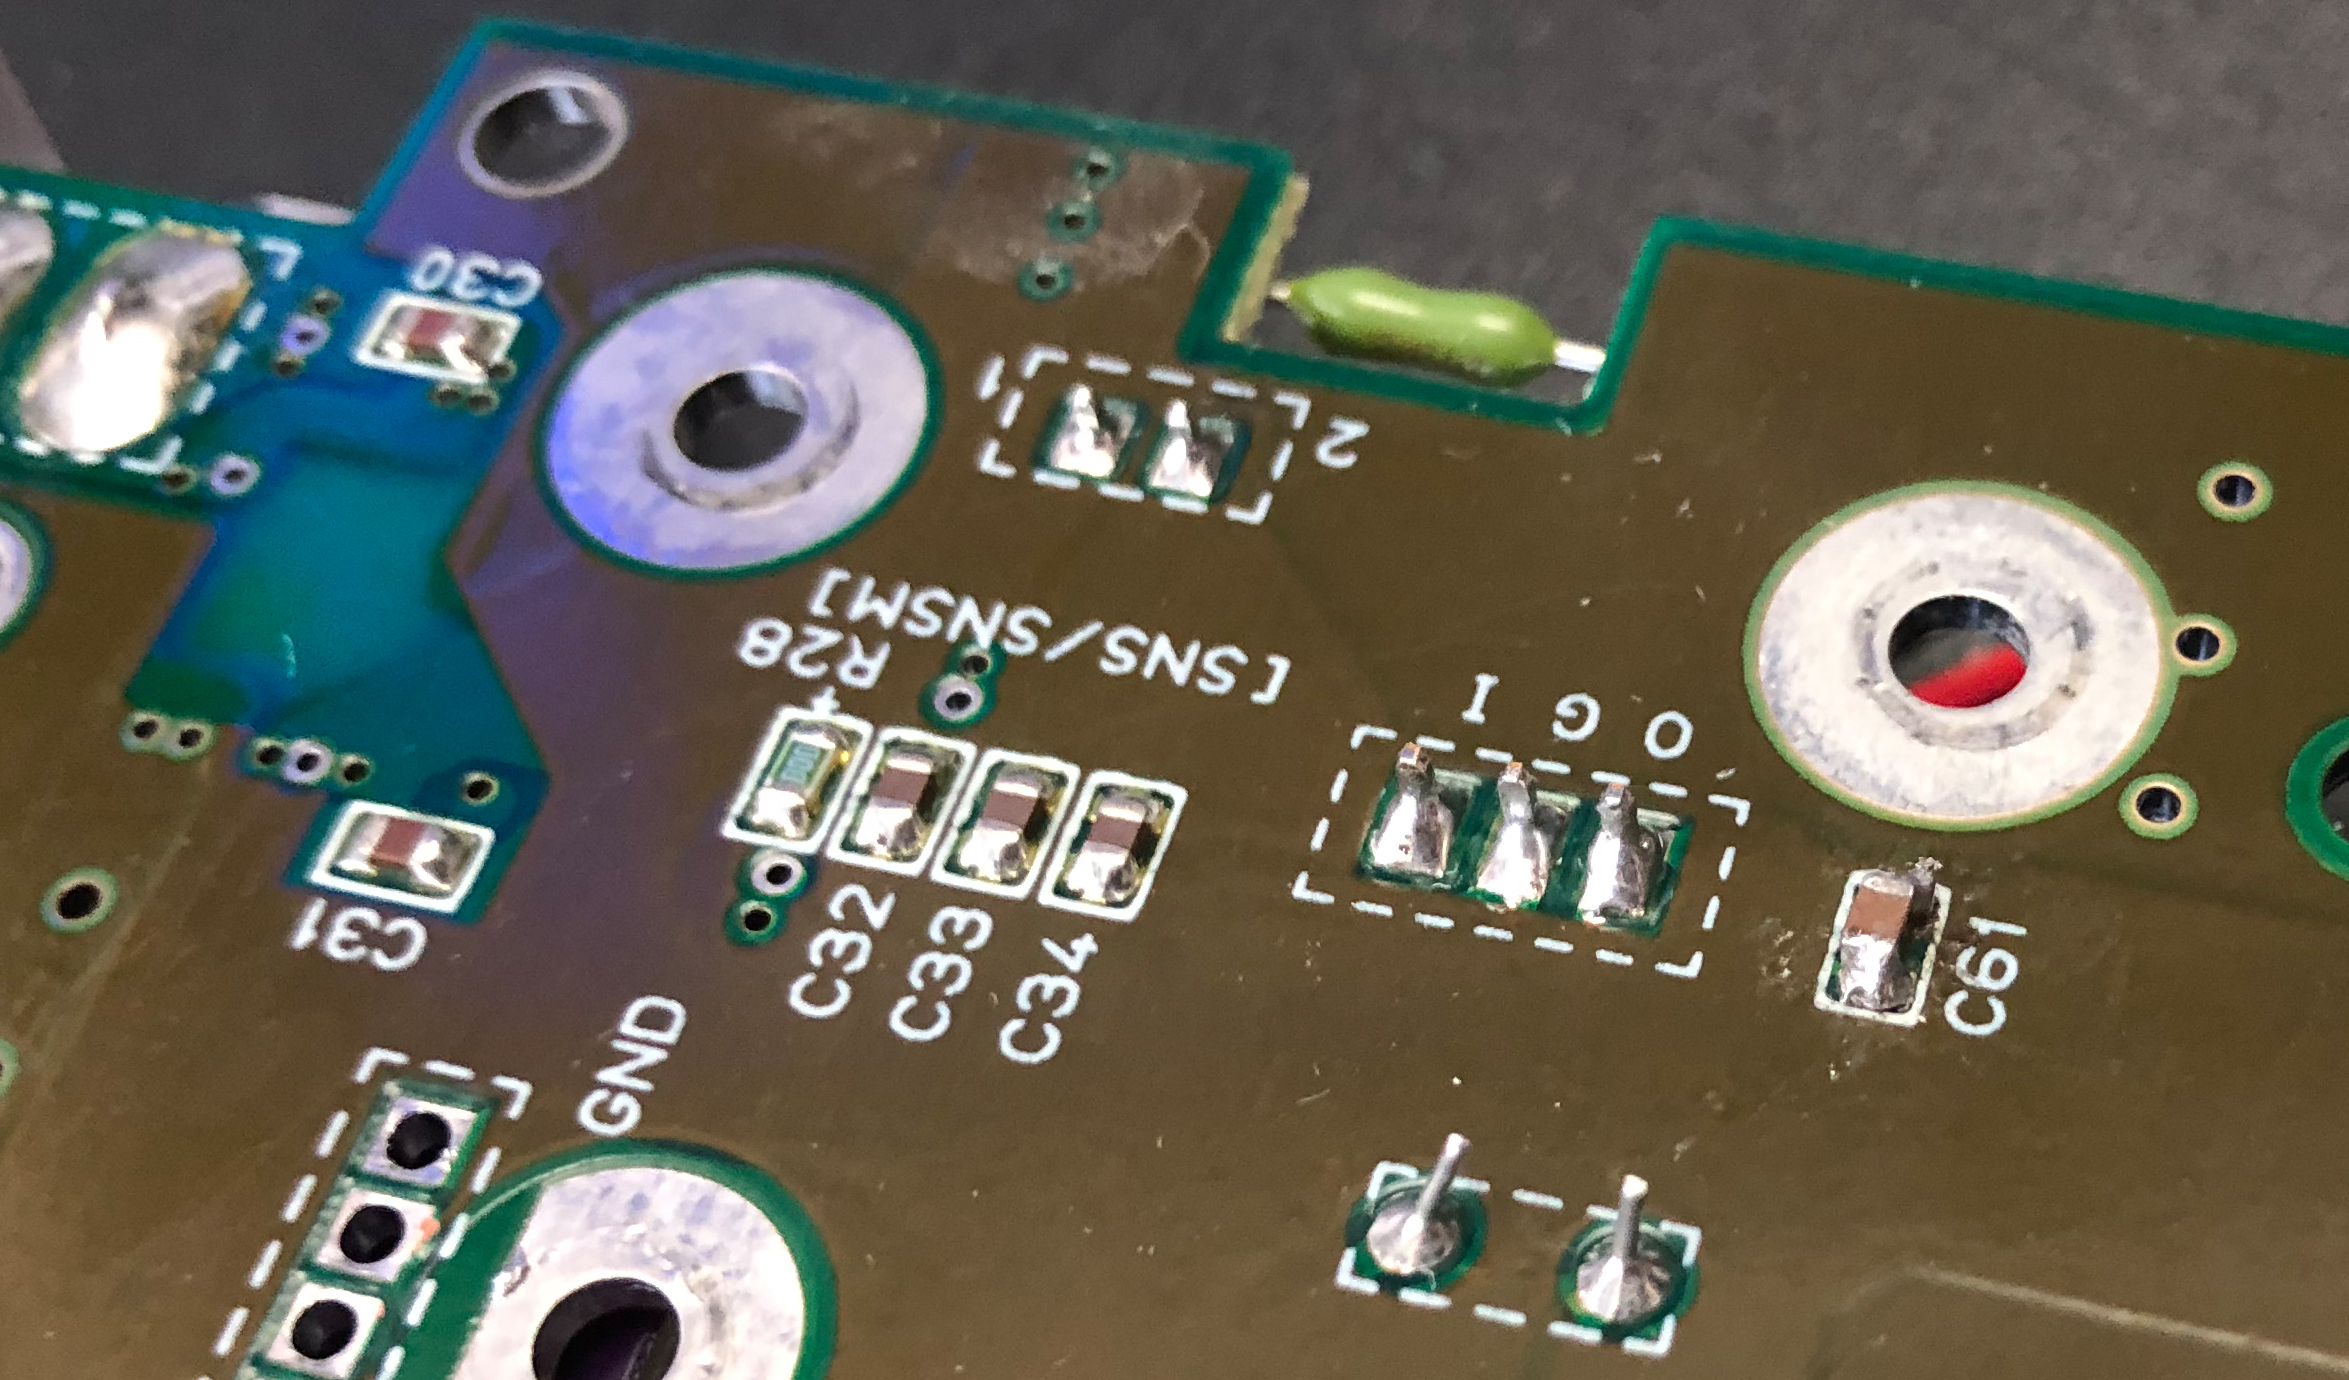
Also, replacing the 1uF surface mount capacitor on the voltage regulator’s output circuit with a 22uF should also help a bit. On this 1CHIP-02 it was C61, but regardless of revision, I posted a video showing an easy way to determine the correct cap to change using a cheap multimeter: https://youtu.be/57f8ArzKK0U
While this mod certainly isn’t necessary and earlier models of the SNES don’t have the white line at all, replacing an aging voltage regulator with a new one is always something I prefer to do. 7805’s tend to last a long time, but they will eventually fail. Considering how cheap they are, I’d replace them on every console I’m restoring…but make sure to use the correct replacement! There are some new voltage regulators that don’t require a heatsink, but may add vertical interference to the video lines! I’d stay away from those and make sure to just use the 78S05.
“Ghosting” Fix

While the SNES 1CHIP’s have sharper video, one of the drawbacks is a “ghosting” effect that can sometimes be seen in certain screens. While it’s not too big of a deal, it was enough to bother some people and luckily a fix was found: Simply replace C11 on any 1CHIP or mini console with a different value and the ghosting goes away.
Unfortunately, the effect is extremely hard to capture on camera, but it is something noticeable. And of course, if someone points it out, you’ll never be able to un-see it. If it’s something that bothers you, here’s the cap for each console:
1CHIP Ghosting Cap: https://console5.com/store/0-47uf-470nf-10-35v-x7r-ceramic-capacitor-smd-surface-mount-snes-c11.html
SNES Mini Ghosting Cap: https://console5.com/store/0-47uf-470nf-10-35v-0603-x7r-ceramic-capacitor-smd-surface-mount-snes-mini.html
RGB Bypass
One mod I’ve always enjoyed doing to SNES 1CHIP and Mini consoles is bypassing the internal RGB amp and routing the RGBs signals through a more modern, higher quality amp. To be clear: THIS MOD IS NOT NECESSARY ON ANY SNES EXCEPT THE MINI!!! All models of the SNES except the Mini output RGB natively and do not require a mod for RGB. Also, RGB bypasses are mostly useless on the original (non 1-CHIP) motherboards, as the image is still blurry after a bypass. Please read through the SNES section for more info: https://www.retrorgb.com/snes.html
Now, while this mod isn’t necessary and only gives a small performance boost, please remember that we’re now scaling these consoles to 1080p, 4K and beyond. If you’re using a consumer-grade CRT, or 480p scaler, you most likely won’t notice a difference from a 1CHIP SNES’ native RGB output vs a bypassed, but anyone with an OSSC using custom timings on a nice flat-panel will notice a small difference in sharpness and colors. While at the moment, RGB-bypassing a 1CHIP is really just for people with OSSC’s and calibrated BVM’s, there will come a time that 4K retro scalers exist and small differences like this will start to be a much bigger deal. If you enjoy modding and a small video performance boost is worth it to you, this might be a fun mod to do.
Check out the SNES Section for guides and explanations of the 1CHIP and Mini mods. Also, check Voultar’s store for high quality boards: https://voultar.com/
Digital Audio Mod
Some classic game consoles have audio chips with the ability to generate digital audio. In these consoles, it’s possible to add a board that translates this digital audio into TOSLINK / SPDIF outputs that give a crystal clear output, with no analog buzz at all.
If your console is compatible (and all SNES revisions are) and you game on anything other than your TV’s built-in speakers, then I highly recommend at least considering this mod. Even if the only difference between the sound of the digital mod and shielded analog cables is the lack of analog interference, it’s still a difference anyone with a surround sound system, or who games with headphones might appreciate.
There are some shortcomings to doing this mod on a SNES though. First, the frequency the SNES generates it’s audio might not be compatible with all receivers. I went years without having any issues, then upgraded to a newer Denon receiver that isn’t compatible, so please keep that in mind when installing.
Also, this mod won’t work with any SNES cartridge that generates it’s own sound, separate from the on-board SNES chips. At the moment, I believe the only things affected are the Super Game Boy audio and MSU-1 audio from the FXPak Pro, so using original SNES games isn’t an issue.
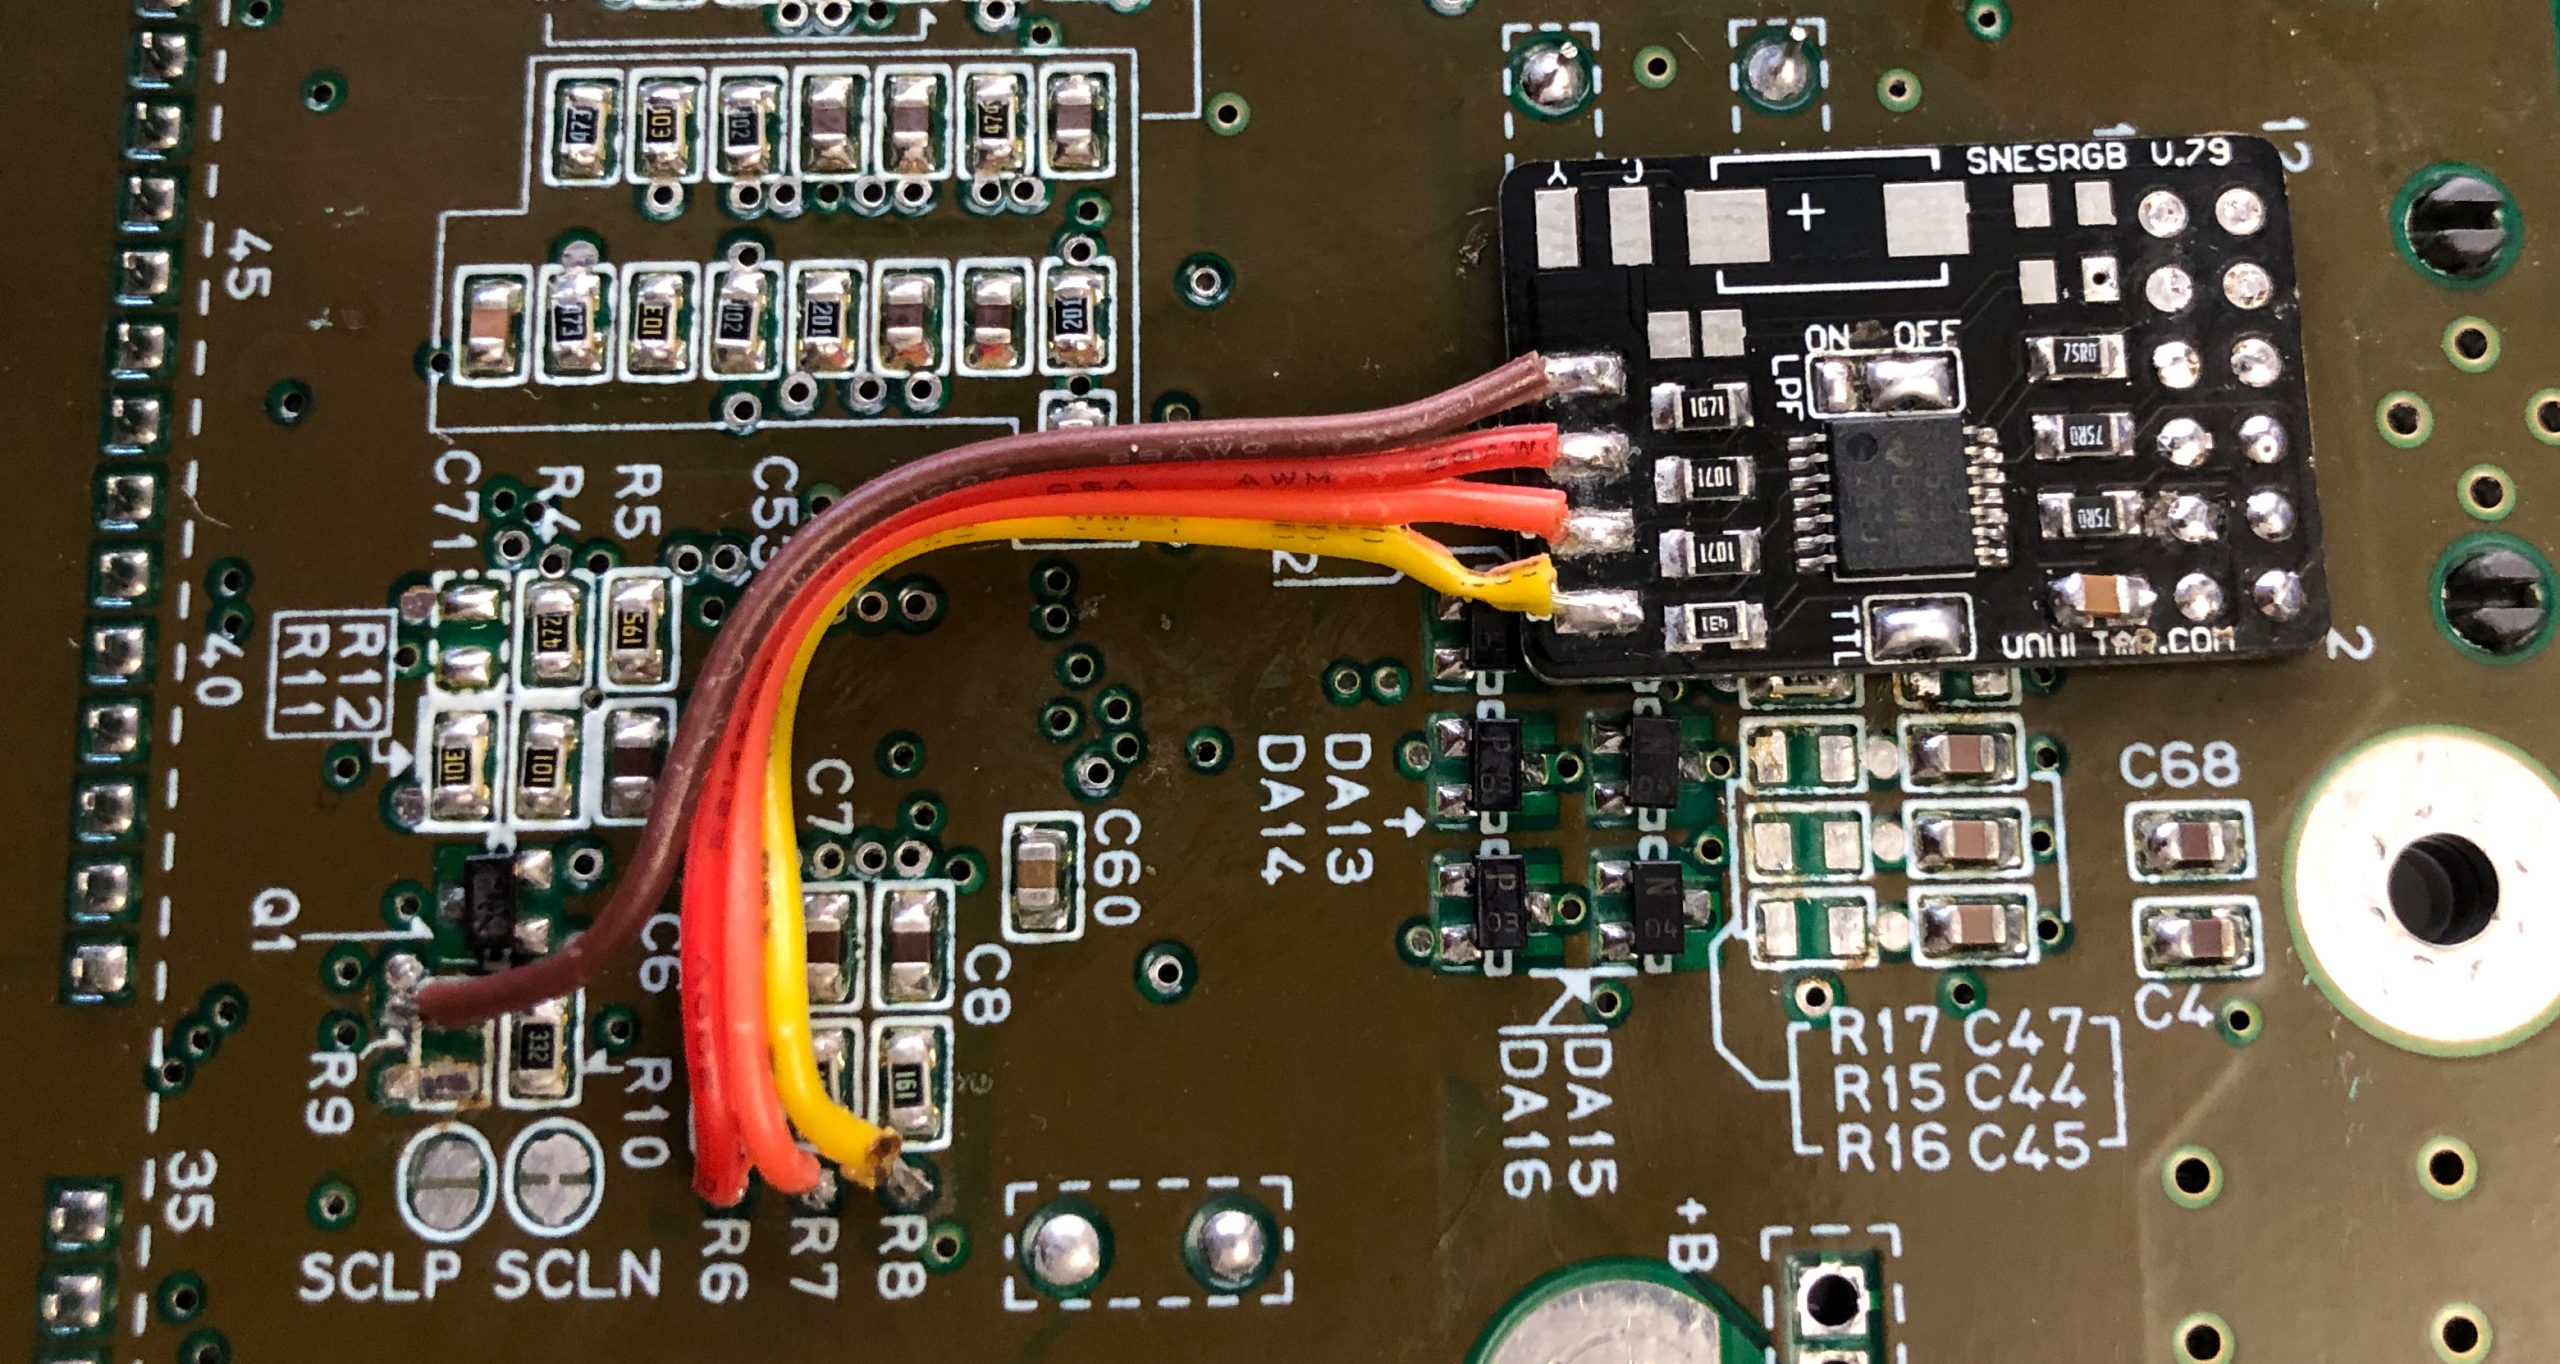
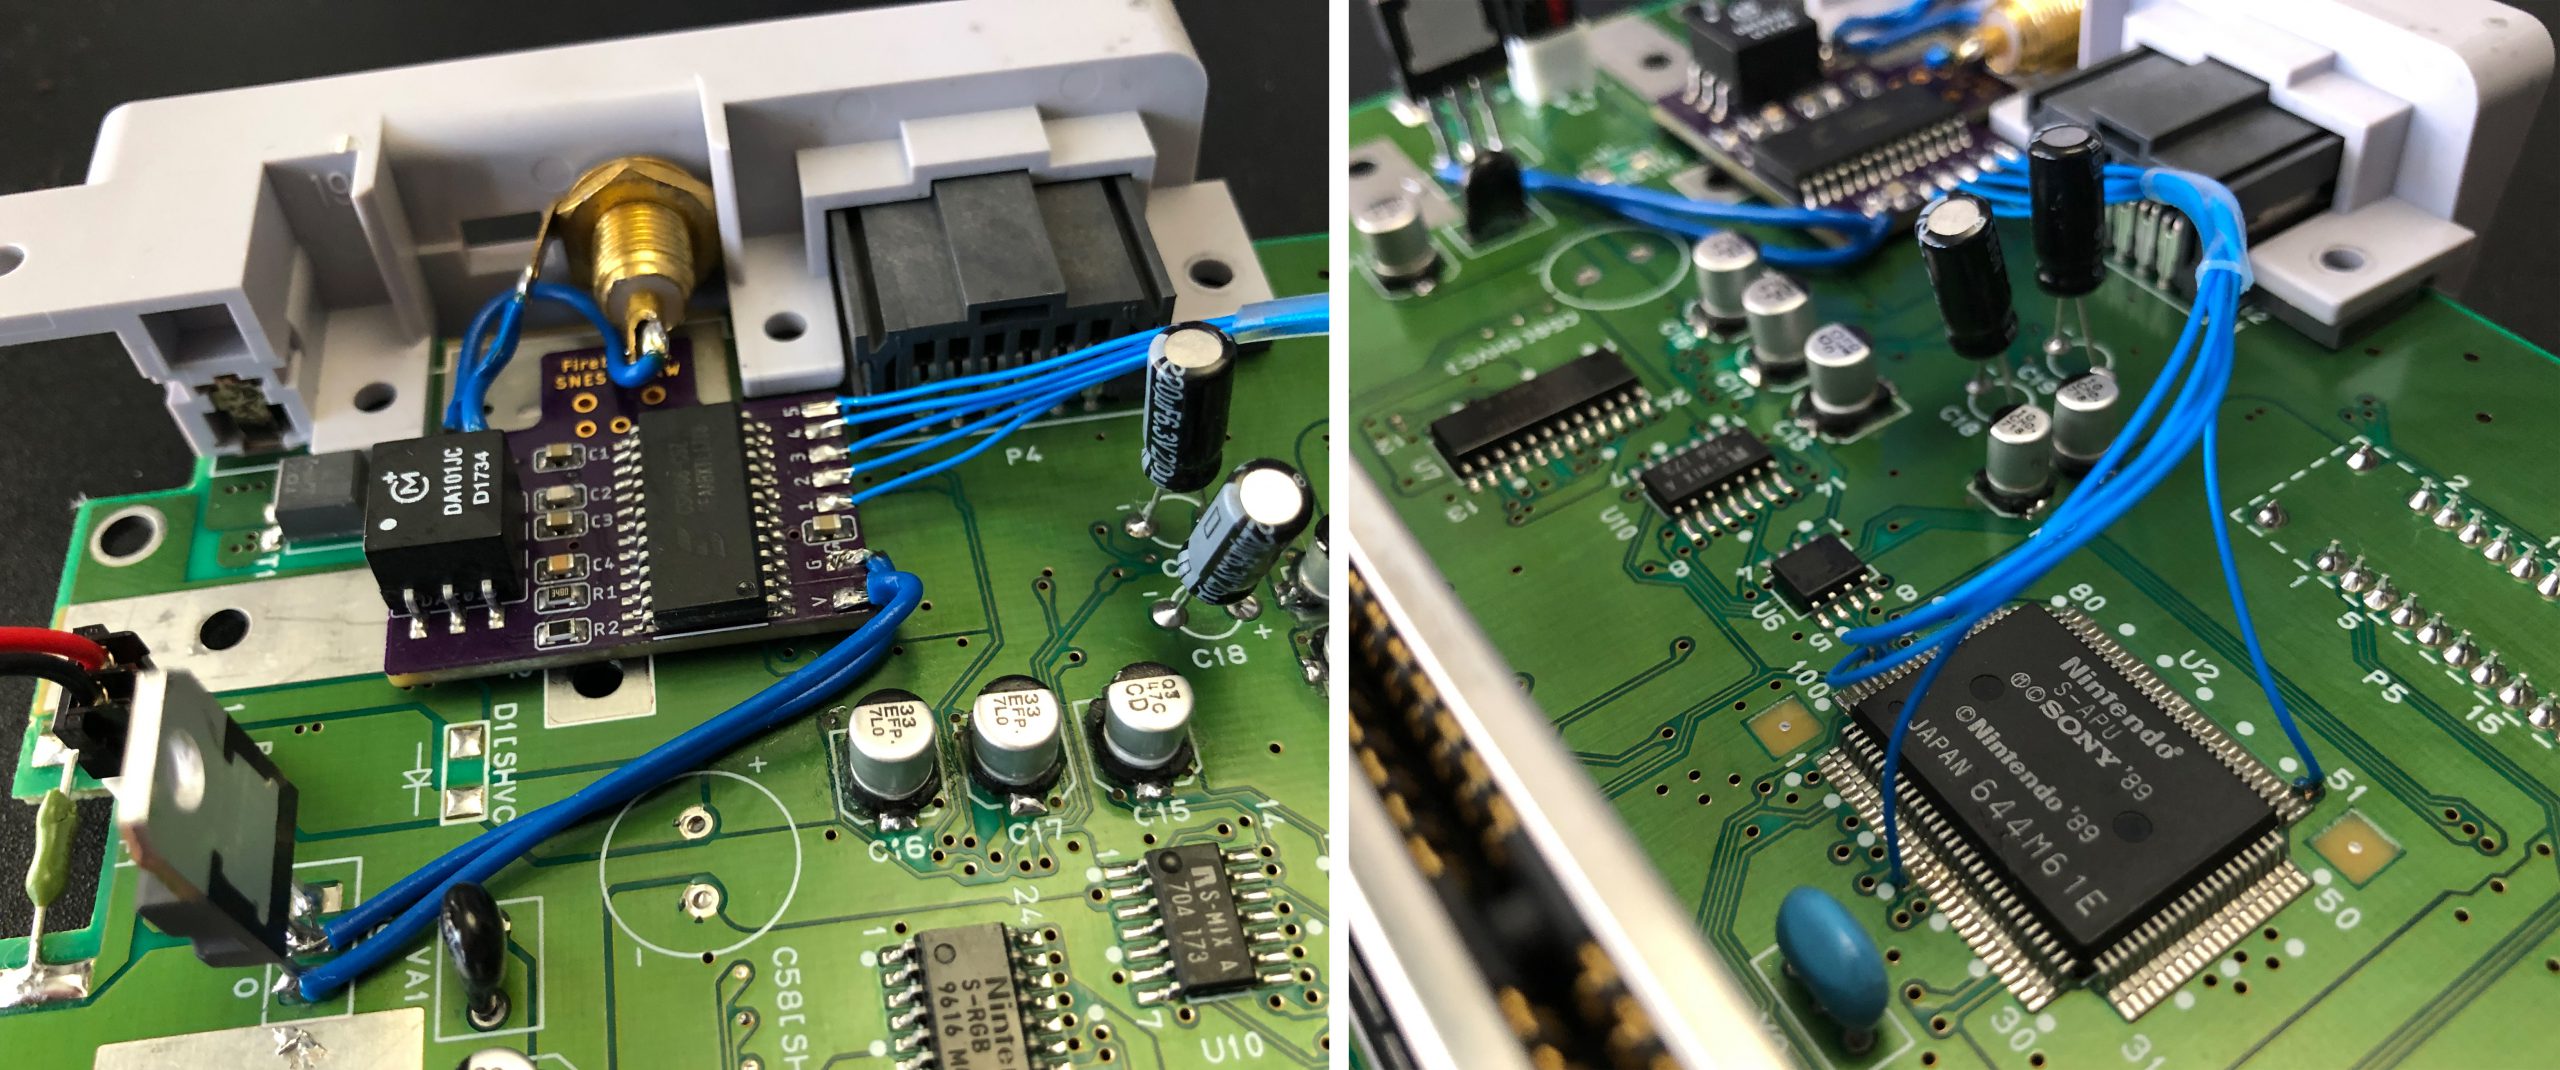
There’s a few different versions of this mod available: The original, which is shown in all the guides on RetroRGB was designed by Borti and an excellent choice. I wanted to use a version that wouldn’t require me to cut any plastic on my SNES (#nocutmod), so this installation uses a board made by FirebrandX; It’s essentially the same thing as Borti’s and the same installation method, but allows you to use an RCA connector. There’s also a great version by qwertymodo that using a MiniTOSLINK jack and fits perfectly in the SNES Mini, but not the 1CHIP’s. Check his Tindie store in the future to see if he posts an alternate version that bolts directly in place of the RF jack: https://www.tindie.com/stores/qwertymodo/

Conclusion
As stated at the beginning, the only thing I spoke about on this page that I think should be “required” is opening your classic console and checking it for damage…and especially for leaky capacitor damage. I also think opening and cleaning your controller is worth it as well, both for sanitary (imagine all the teenage sweat and germs that were rubbed on that) and performance reasons.
Other than that, any “upgrade” I mentioned is something that you might want to consider, but by no means would it be “necessary” for a great classic console experience. In fact, some of the enhancements I spoke about here can be achieved by using FPGA hardware emulation, such as the MiSTer and might even be cheaper and easier overall.
I certainly don’t want to give the impression that enhancing original consoles is the only way to get the most out of these games, but just like there will always be people who prefer classic cars, older music and vintage clothing, there will also always be people that want to game on original consoles. On top of that, there are those of us who enjoy a hardware project as much as playing a game. If you’re that type of person, guides like this are for you and feel free to check out the rest of the site with tons more guides and info to get you started!
