
Here’s a review of the AVerMedia Live Gamer 4K (GC573) PCIe capture card, from the perspective of a retro gamer. Overall, it performs okay and can accept fully uncompressed (4:4:4) colorspace from 1080p60 and 4K60 sources, but it has some limitations for doing things like side-by-side comparisons. Also, while it does work with the OSSC and SNES in 5x mode, you’ll run into audio dropouts. See below for more info:
Live Gamer 4K: https://amzn.to/3eYDzZs
Used Live Gamer 4K: https://ebay.us/3a4UYn
Datapath Vision: https://www.retrorgb.com/datapathcapture.html
There’s a few things retro gamers are all looking for when buying a capture card: OSSC compatibility, color/image processing and price. Let’s go over each one!
OSSC Compatibility
The first thing I wanted to check is compatibility with the Open Source Scan Converter. Even with the release of new RetroTINK products, as well as some cool products on the horizon, many people still own and love an OSSC. The Live Gamer mostly supports the OSSC: It will accept video from an unmodified Super Nintendo in all modes (including 5x!), but you’ll sometimes get audio dropouts. Since the OSSC is doing an analog to digital conversion of the audio anyway, you can always just use the 3.5mm audio passthrough jack (switchable on later OSSC models), bypass the capture card’s audio input, and run audio directly to your PC’s analog audio input.
Something to note, is the HDMI passthrough built into the card seemed unaffected by the card’s audio dropouts: My TV sounded fine and I even tried using an HDMI audio extractor to capture the audio directly from the passthrough; That’s kind of a waste for your own setup, but I wanted to double and triple check.
As a note, I tested the HDMI passthrough with a Time Sleuth and there is zero lag added to the signal, so the passthrough is 100% safe to use.
Color Compression
Color compression is something that’s much less noticeable on modern consoles, with advanced graphics and lots happening on-screen. With classic consoles, you have a lot of solid colors on different objects, that seem to make compression a lot more noticeable. While conversion from 4:4:4 to 4:2:2 isn’t a big deal for casual streaming, if you’re chasing a high quality capture, you’ll want a device that can accept uncompressed 4:4:4 color from all the resolutions you’re using.
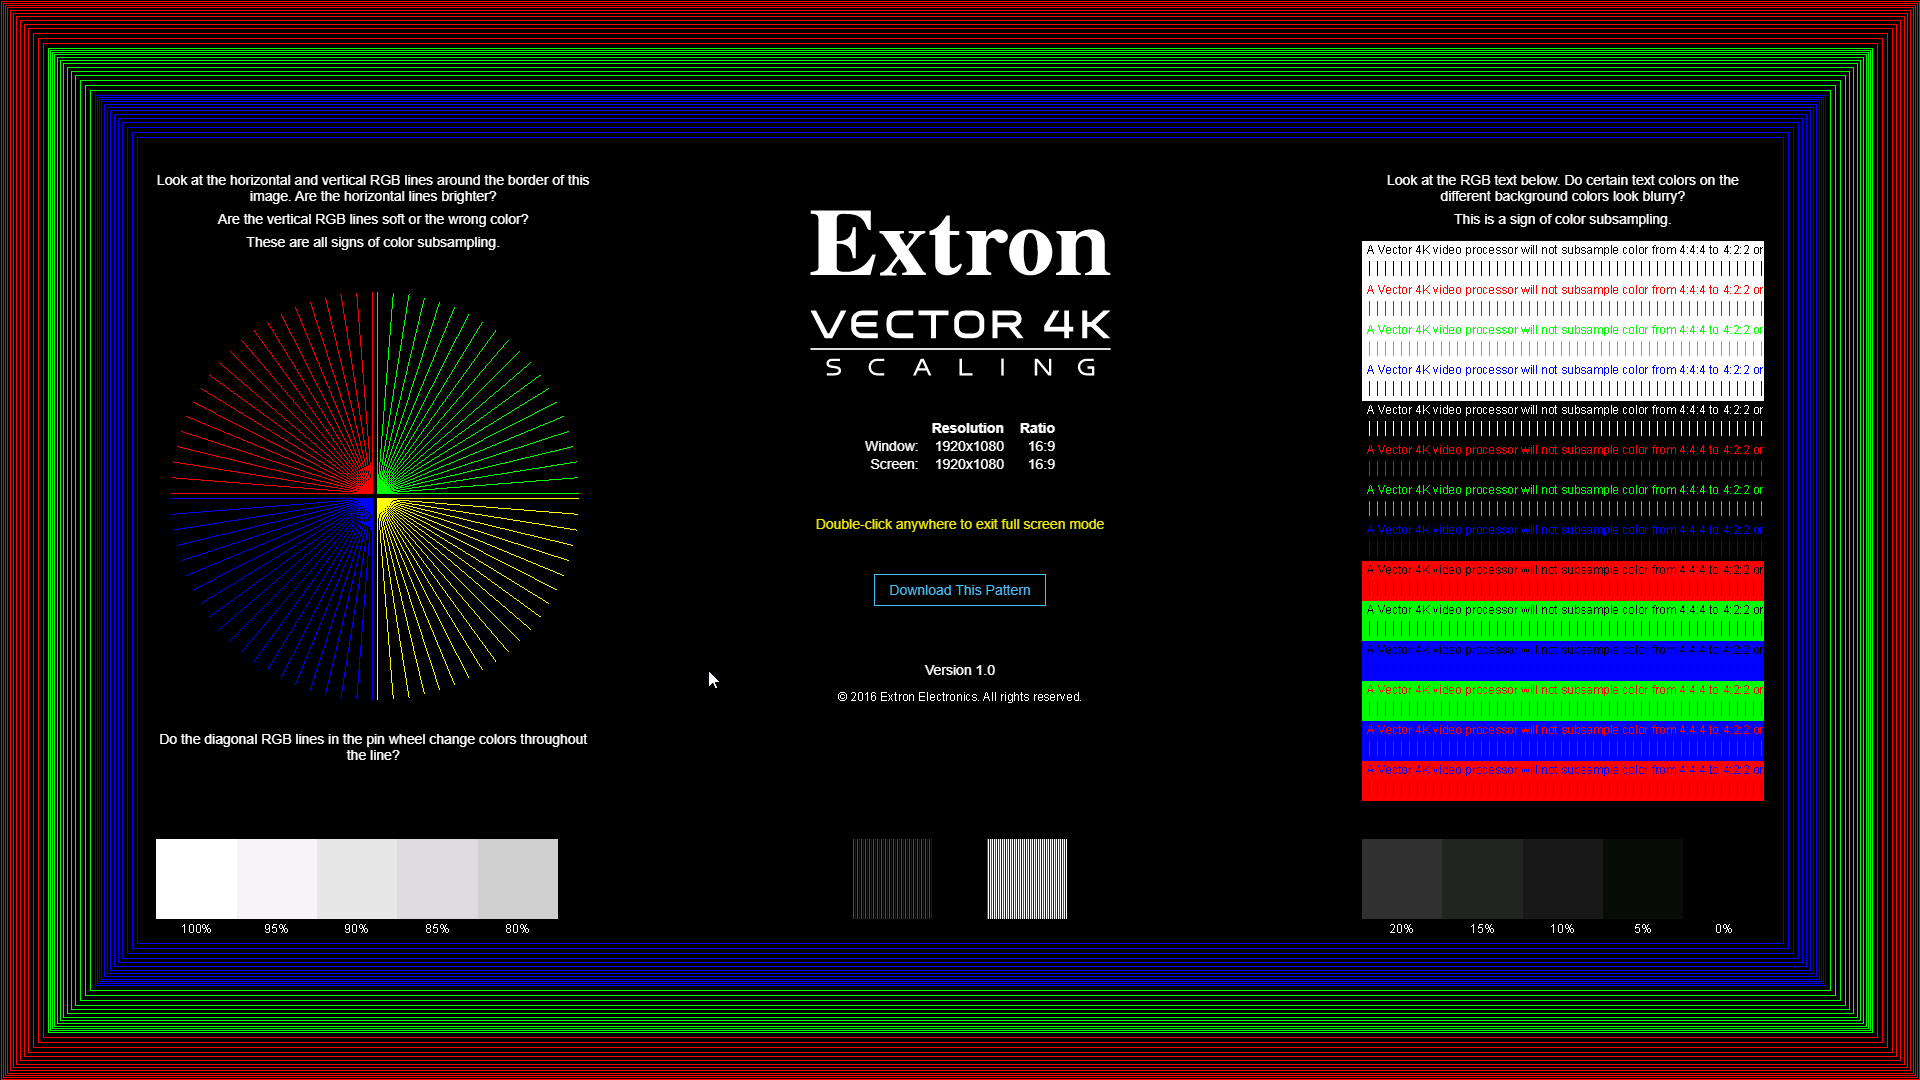
Luckily, Fudoh sent me a link to a dynamically-scaling pattern that will help test for color compression – To use it, make sure to set your PC’s resolution to the exact output you want to test, make sure your display’s “scale and layout” is set to 100% (not zoomed) and hit F11 to make the web browser full-screen: http://pms.hazard-city.de/ExtronVector4KTestPattern.html
Before I show capture examples, I want to take a moment to demonstrate how to get uncompressed .png captures from Avermedia’s RECentral software; If you don’t change the settings, all your screenshots will be compressed by default, making these tests inaccurate. You could also use software like VirtualDub2 and manually set the options there, but I wanted to show how to do it using Avermedia’s own software:
Start by hitting the “Edit” button, next to the card on the left (click all pictures for full-sized views):

Then, you’ll need to check a few things. First, uncheck auto-setup. Then, verify the resolution and refresh rate the card detects, which is listed under “Input Source Info” and change the drop-down menu to match what’s listed. Next, set the Decode Format to RGB24, then hit the “Settings” button and set the color range to the full 0-255 “Expanded” setting. Then hit yes to everything and go back to the main screen. Now just hit the camera button to take screenshots:
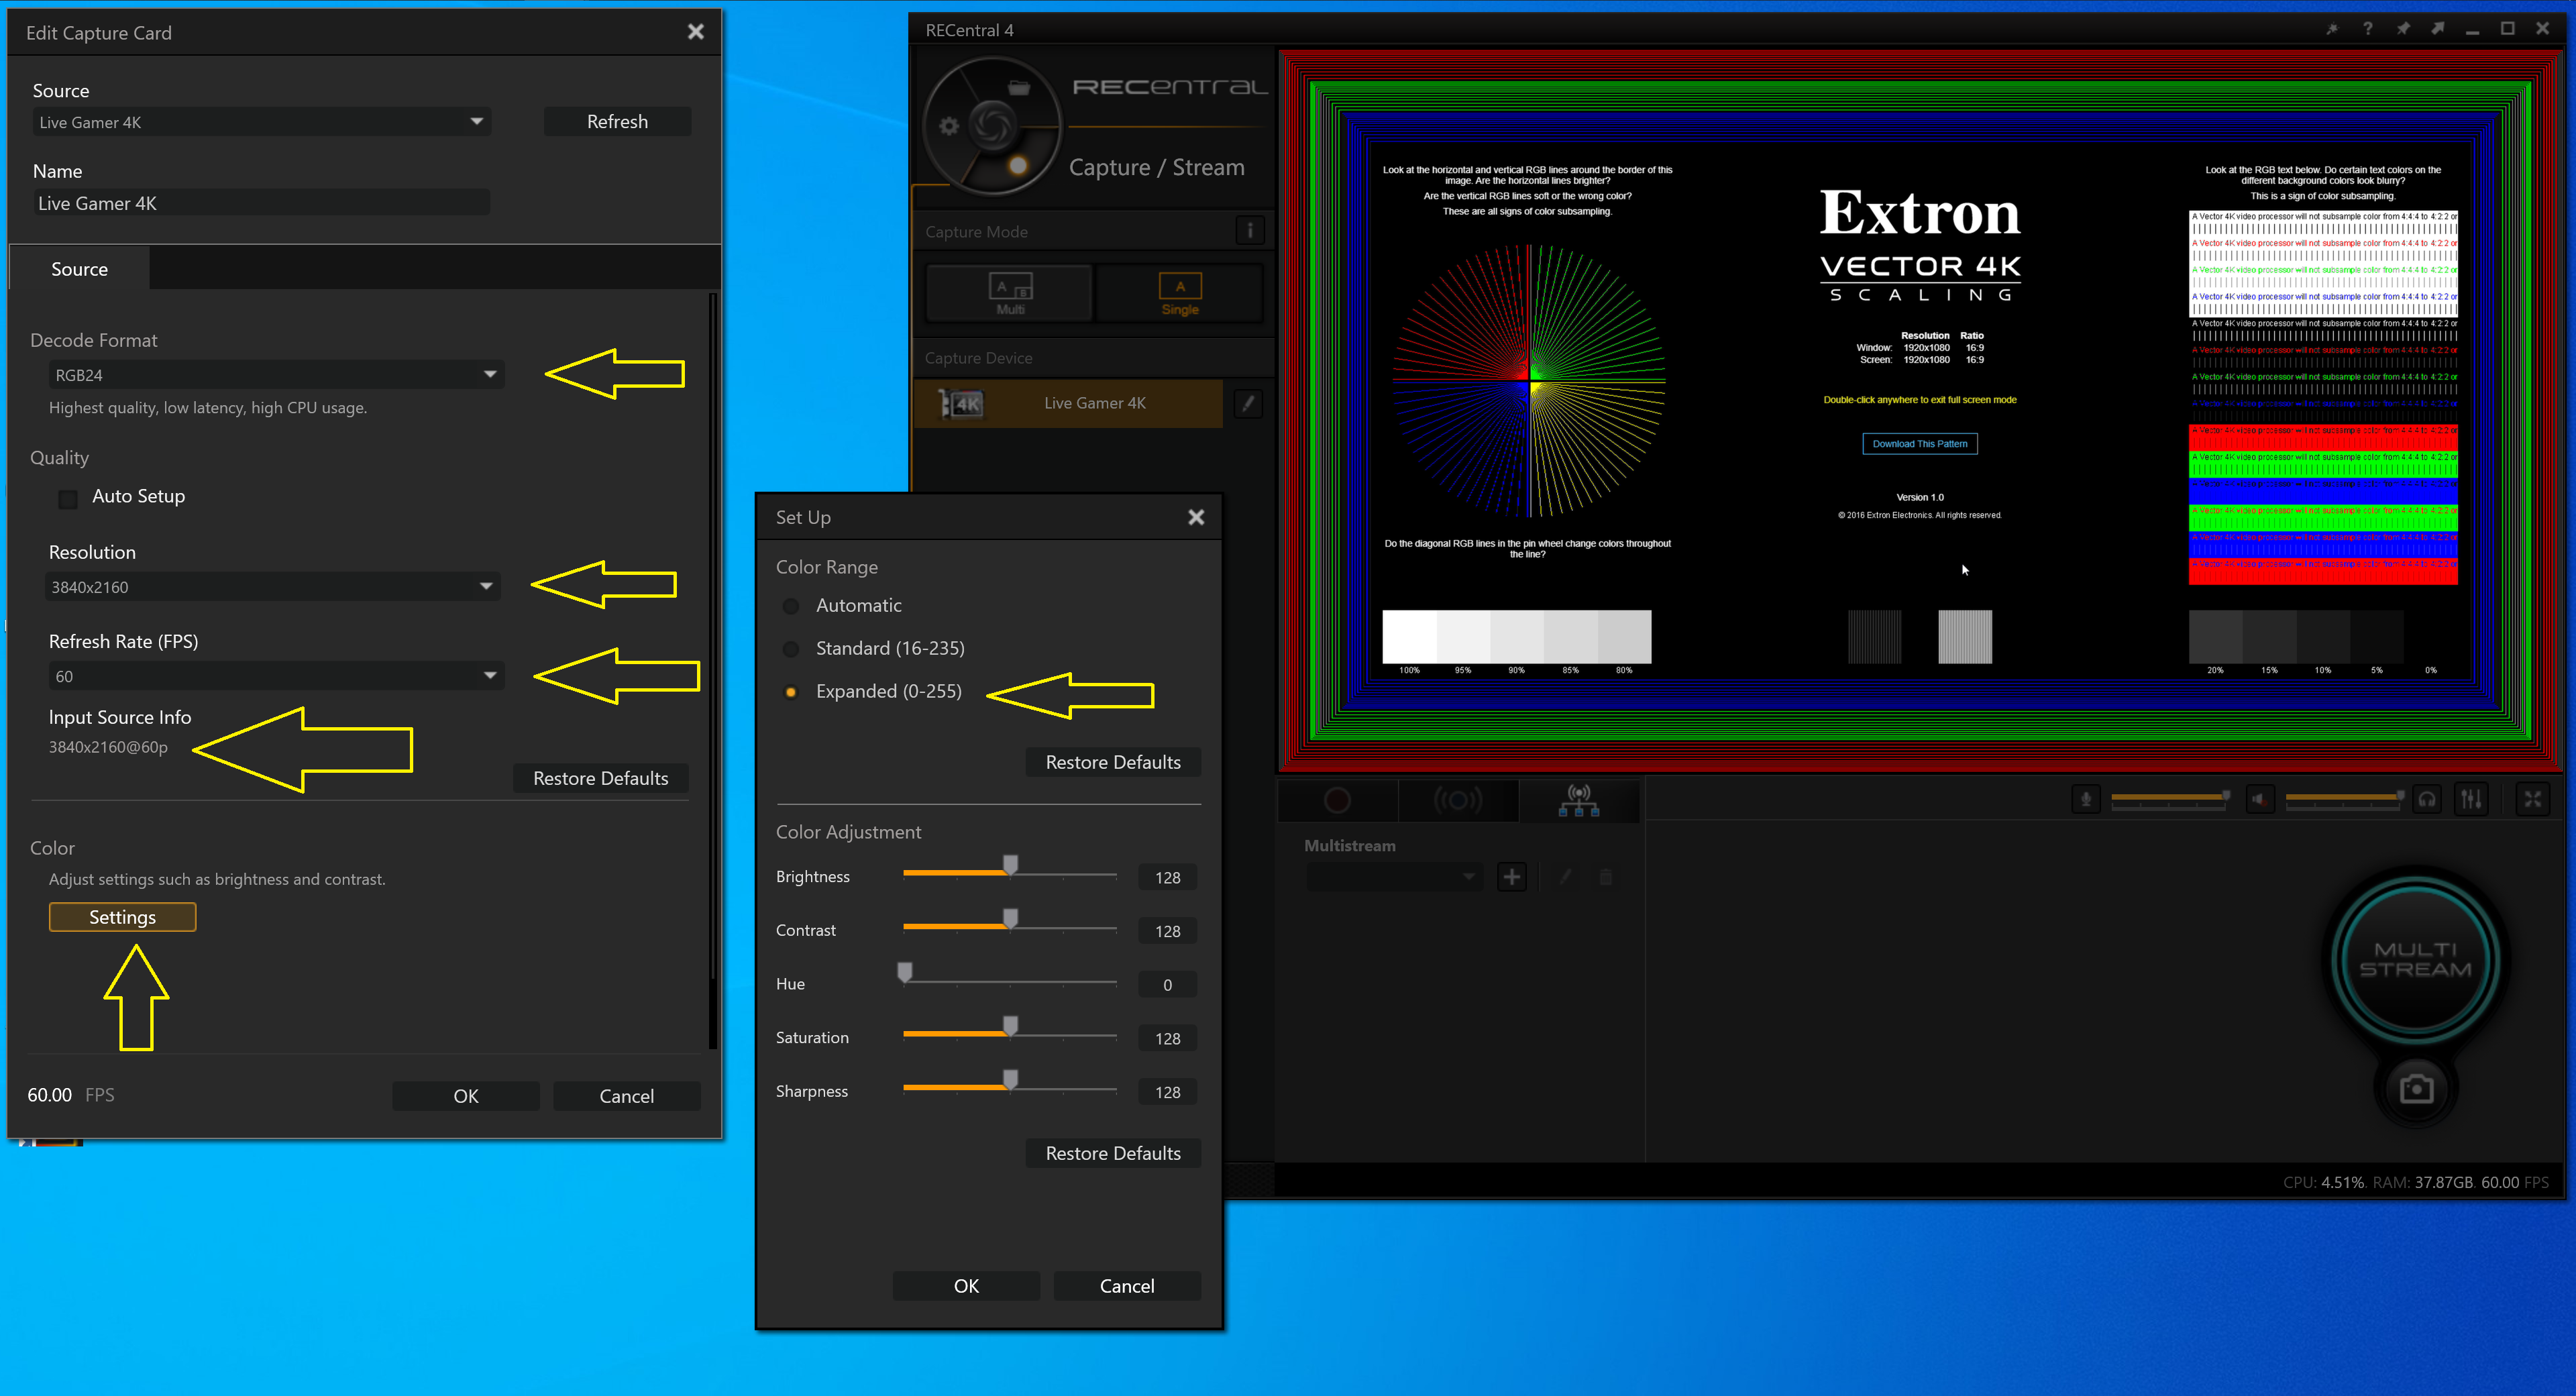
To start, here’s an example of true 4:4:4 color processing, vs 4:2:2 or 4:2:0 – Notice the even spacing of the vertical lines…and, of course, the text. There’s no need to label which side of this picture is being processed correctly 🙂

These aren’t the most entertaining screenshots to look at, but they absolutely demonstrate what we need to see – The text is readable, the border lines are even and the color gradients are all visible. And please remember that you’ll need to view all of these in a full-sized view, or they won’t look right:


Those pictures were 1080p, 4K and 1080p scaled to 4K using the RECentral’s settings. I’m not sure why you’d ever want to do that, but at least if you ever accidentally leave RECentral set to 4K while capturing 1080p, you know it won’t ruin the colors.
EDIT – This last paragraph might be incorrect: I think this was an EDID / Windows 10 issue. I believe as long as you feed it a native 1080p signal, it’s fine!
One interesting thing to note, is the same exact capture taken with a Datapath Vision seems a bit sharper and brighter. Now, we’re talking about a card that’s almost five times the price of this one new, so it’s not a fair comparison. It’s still enough of a difference that I’ll stick to my Datapath for all comparison shots that are 1080p (and lower). For streaming (or capturing video from a camera), I’d be happy to use either, but when you’re zooming into a capture 100x, the differences are much more noticeable and will skew comparison results.
Audio
I recorded an MDFourier test file via an Oppo Blu-Ray Player into the Live Gamer 4K and – as expected with digital-to-digital captures – there was zero change to the audio signal. While it’s great to confirm the Live Gamer 4K doesn’t harm the digital audio in any way (at least the 2.0 audio used in the test file), it’s actually very uncommon for any digital audio device to perform differently. Here’s the proof, indicated by nothing in the graph, demonstrating no differences:

Price
I think the most important thing to note about this capture card, is the price tag of about $220. While that’s certainly not “cheap”, you’re getting quite a lot for your money. In fact, many other capture cards in the same price range won’t be able to perform as well!
So, the determining factor in buying this card, should be use case: Are you looking for an internal, PCIe capture card, compatible with a ton of different consoles, for the purpose of streaming? If so, this is a great buy.
If you’re looking to capture the best 1080p60 possible, for the purpose of reviewing video equipment and doing comparison shots, this card isn’t the best choice. For 1440p and under, I’d suggest a used Datapath Vision, which is even compatible with analog video:
Live Gamer 4K: https://amzn.to/3eYDzZs
Datapath Vision: https://www.retrorgb.com/datapathcapture.html
On the flip side, if you’re a casual streamer on a budget, you could always try those CamLink clones that EposVox lovingly dubbed the “can’t link”, however those present some issues: First, at around $20, some will probably arrive broken. I bought one that stutters so bad, it’s completely useless, while other people have bought some that work fine. Even if yours works, you’ll want to run it in 480p or 720p modes, as they can’t process 1080p60 – It might accept the signal, but it’ll cut the framerate to 30. Still, at 1/10th the price of the Live Gamer 4K, it might be a good starting point for casual streamers:
“CantLink”: https://amzn.to/3kYqJ1d
I did a video last year that talks a bit more about OSSC compatibility with capture cards. The “blue” one I tested in that video is a decent choice as well and can accept 1080p60 from the OSSC, but it’s more expensive then the cantlink. The video’s worth checking out if you’re interested though!
View this post on Instagram
